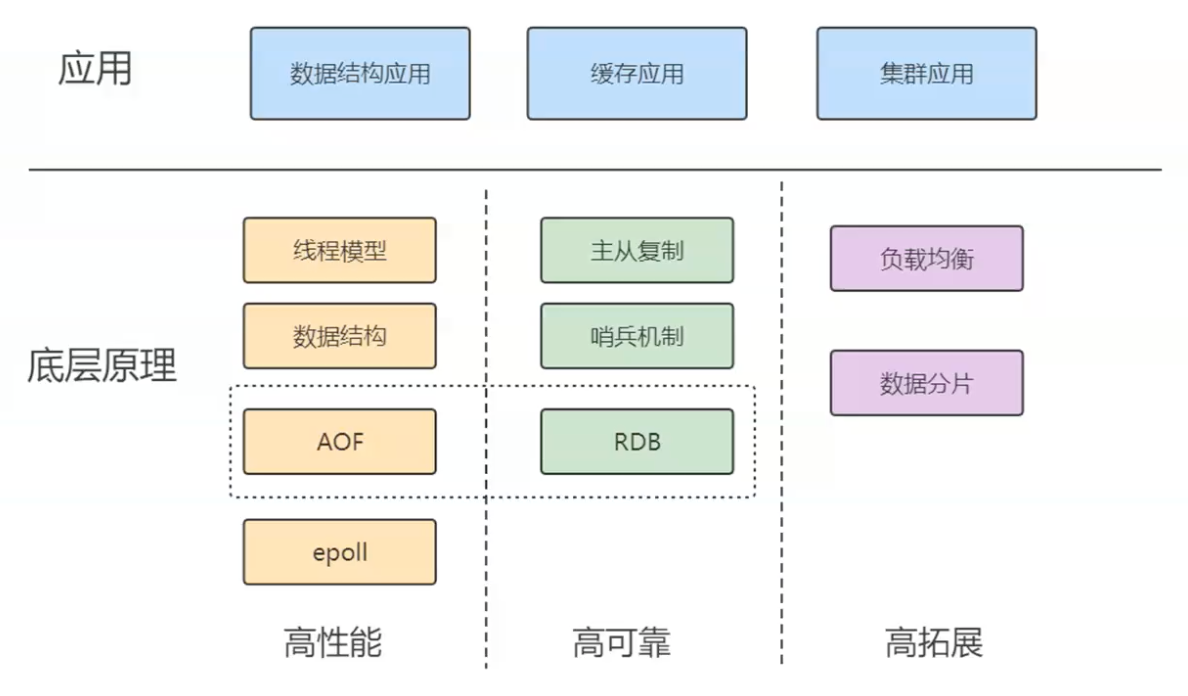
redis学习的整个体系
1.文件读取与底层存储瓶颈
数据存储在文件中时,例如data.txt,读取方式有:
- Linux平台下:grep, awk等命令行工具进行文本处理和搜索
- 用编程语言写一个程序读取文件再查找,比如java的IO流。
补充:存储介质的关键性能指标
【1】数据存在磁盘中,对于磁盘有2个重要的指标:
1.寻址,ms级别
2.带宽,MB/s,GB/s,TB/s
【2】内存的重要指标:
1.寻址,ns(纳秒)级别,比磁盘快10万倍
2.带宽,很大
以上关键指标整理为下面的表格:
介质 指标 性能级别 相对速度 磁盘 (Disk) 寻址时间 (Access Latency) 毫秒 (ms) 级别 慢 带宽 (Throughput) MB/s, GB/s, TB/s 内存 (RAM) 寻址时间 (Access Latency) 纳秒 (ns) 级别 比磁盘快 10 万倍 带宽 (Throughput) 非常大 核心矛盾: 磁盘是存储大量数据的理想选择,但其寻址时间太慢(ms 级),是主要的性能瓶颈。
【3】I/O Buffer( I/O 缓冲与磁盘格式化)
成本:磁盘有磁道和扇区。磁盘的最小物理存储单元是扇区 (一般 512B)。如果读取单位过小,查找对应扇区(即索引)的成本(寻址时间)相对会变大。1扇区一般512B,1T会有很多512B。如果区域足够小,找哪个扇区(索引)的成本就会变大。
现代操作系统在格式化硬盘时,倾向于使用 4KB 对齐,不再以512B为一次的 读写量。即,操作系统无论请求读取多少数据,最小都会从磁盘中读取 4KB 的数据块。
如果文件越来越大,读取速度会变慢,因为频繁的磁盘 I/O(寻址和读取)会使硬盘成为瓶颈,即 I/O 成为瓶颈。
为了解决磁盘 I/O 成为瓶颈的问题,出现了数据库。
2.数据库的底层设计与优化
【1】data page的出现:数据库引入 Data Page(数据页)的概念,通常定义为 4KB 或其倍数(如 MySQL InnoDB 的默认 Data Page 大小是 16KB)。最小4KB,与格式化磁盘的“4KB对齐”正好对应上了,即符合1次I/O。如果data page定义比4K小,比如1K、2K,则会浪费操作系统的读取。如果data page定义比4K大,那无所谓。即,将 Data Page 定义为 4KB 恰好与操作系统最小读取单元的 4KB 对齐机制相对应,从而确保一次 I/O 操作就能读取一个完整的 Data Page,避免浪费。
data page的出现,还是全量的IO(顺序或全表扫描),还是和之前速度类似,性能提升有限。更快的处理是:建索引,引入索引来加速查找,即建立对于data page索引的关系的表格。
【2】data page的索引。随着数据增大,索引也会变多。建立索引,其实变相来说,也是一种数据。索引本身也是数据,通常也存储在磁盘中。
关系型数据库建表,必须先给出schema,即给出表的每个列、每个列的类型(字节宽度,即一种约束)。先给出schema,从而固定了每条数据的宽度(约束)。
存储时,会更倾向“行级存储”,即以行为单位进行存储,即使某些字段是空,也会占位。增删改差,不需要移动数据,只需要覆盖即可。
数据库的存取机制是充分利用磁盘的大容量和内存的高速度。数据和索引都存储在磁盘中,读取时,需要在内存中准备一颗B+树(一种高效的磁盘存取数据结构)。命中某个索引后,将 B+ 树的树干或叶子节点(即索引页)从磁盘加载到内存。 通过内存中的索引,确定目标数据所在的 Data Page,然后将这个 Data Page 从磁盘加载到内存。在内存中的 Data Page 里找到最终的数据。
这种设计就是为了减少磁盘 I/O 的流量和寻址次数。B+ 树结构保证了无论是访问哪个 Data Page,寻址路径(树的高度)都是非常短且固定的,从而大大加快了遍历速度。
以上,充分利用各自的能力,磁盘发挥存储大量数据的作用,内存发挥读取速度快的作用,利用B+树这个数据结构,就可以加快遍历数据的速度,数据又是分而治之的存储,所以,最终数据存取非常快。
其实这样的设计,就是为了减少IO的流量。磁盘读取速度这么慢,尽量避免磁盘的IO流量与寻址。
面试题
【面试】:如果数据库存储的数据量变得很大,比如1T、2T,检索速度或者说检索性能一定会变低,对不对?
答:不完全对,需要区分单次查询和高并发场景:
如果表有索引,增删改会变慢,因为需要维护索引。索引可能会被修改。
查询来说,1个或者少量查询依然很快,因为因为 B+ 树的高度增加非常缓慢(1T 数据可能树高仍然只有 3-4 层),单个查询需要的磁盘 I/O 次数变化不大。
但如果并发大,此时真正的瓶颈是硬盘带宽。在高并发情况下,系统可能需要同时加载多个 Data Page 和索引页到内存。由于硬盘的带宽是有限的,大量并发的 I/O 请求会互相等待,导致整体吞吐量下降。
3.数据量大如何快速查询数据库-缓存的引入
数据在磁盘存储和内存存储之间,会存在“体积”(即占用空间)的差异,
举例说明:传统关系型数据库和像 SAP HANA 这样的内存数据库
【1】在传统的基于磁盘的关系型数据库中,为了保证查询效率,数据和索引是分开存储且都需要占用空间的。详细来说,原始数据(例如 2TB)存储在磁盘上。数据库需要构建索引来加速查找 Data Page。索引本身也是数据,它们需要占用额外的磁盘空间。磁盘是持久化、物理寻址的。你不能像在程序中那样,用一个小的内存地址(指针/引用)来指向一个大对象。如果数据要在索引中“出现”,就意味着索引需要存储足够的信息来定位原始数据(例如,一个键值对,其中值可能是指向磁盘地址的物理指针或 Data Page ID)。如果一个数据项需要被多个索引引用,索引系统会为这个数据项建立多个索引条目。这些索引条目加起来,使总存储体积膨胀。
结论: 磁盘上的 总存储体积 = 原始数据体积 + 索引体积。因此,总存储量会大于原始数据量(例如,原始数据 2T,加上索引可能远超 2T)。
【2】内存数据库(如 SAP HANA)利用内存的高速寻址能力,可以采用更高效、更紧凑的存储方式。(管理是统一的,冗余很少)
在内存中,你可以真正使用指针(或引用)的概念。一个大对象存储在内存堆中的某个位置,不同的数据结构(线程、索引)只需要一个很小的内存地址/引用就可以指向它。不是说完全没有索引,而是指:内存数据库可以采用集成或优化后的数据结构(例如,高度优化的列式存储结构、哈希表等),这些结构在内存中可以更高效地管理数据关系,而不需要像磁盘数据库那样在物理上存储一套完整的、冗余的、分离的索引结构。
内存数据库通常内置了强大的数据压缩策略(例如,基于字典编码、位图索引等)。由于数据始终在内存中,可以实时进行压缩和解压,大幅减少占用的空间。许多内存数据库(如 HANA)采用列式存储,对同一列的数据进行优化存储,进一步提升压缩率。
| 存储环境 | 为什么会“张出”(膨胀)? | 为什么会“缩小”? | 关键技术差异 |
|---|---|---|---|
| 磁盘存储 | 1. 必须存储冗余且物理分离的索引(没有内存指针的概念)。2. 索引本身占用大量空间。 | N/A | 物理寻址,I/O 瓶颈。 |
| 内存存储 (HANA) | N/A | 1. 无需存储传统意义上的冗余磁盘索引。2. 可以使用内存指针/引用进行高效引用。3. 采用高效的数据压缩优化策略。 | 内存寻址(ns 级),高压缩率。 |
如果原始数据文件是 2T,传统数据库在磁盘上实际占用的空间(数据 + 索引)可能高达 3T 甚至更多。而当把原始数据加载到 HANA 内存数据库中时,由于索引的存储更高效、没有磁盘I/O的物理约束、并且启用了压缩,数据占用的内存空间反而会小于原始数据体积,变成 1T 多一点。
总结来说,数据在磁盘和内存的“体积不一样”,主要是因为:
- 磁盘存储了庞大的、物理上冗余的索引结构。
- 内存存储可以利用指针/引用和高级压缩技术,极大地减少了冗余和数据本身的占用空间。
以上是2个极端,传统关系型数据库和内存数据库。可能企业买不起HANA这样的内存数据库(很大概率一套内存数据库下来,几个亿)。此时,折中的方案就是——【缓存】。
即,内存级的用不起,只能用磁盘级的,磁盘级的速度又很慢,选择一个折中方案,用小一点的内存,把数据迁移出来。这就是缓存的技术。
缓存的技术很多,比如memcached、redis。
【冯诺伊曼体系结构】与【以太网、TCP/IP网络】这2套现代IT信息系统的基础设施,决定了redis等缓存技术的重要性。
\[\text{寄存器} > \text{L1/L2/L3 缓存} > \text{主内存} > \text{磁盘/SSD}\]计算机内部的天然性能鸿沟(CPU 和内存/磁盘的速度差异)使得数据必须尽可能靠近 CPU。系统级缓存(如 CPU 内部的 L1/L2)是第一层优化;而 Redis/Memcache 则是面向应用层的缓存优化,目的是将数据从磁盘这个最远的存储介质拉到内存这个最近的存储介质。
现代 IT 系统是分布式的,数据和应用分散在网络中的不同服务器上。即使服务器内部的数据库很快,数据从数据库服务器通过 TCP/IP 网络传输到应用服务器,仍然需要额外的网络延迟(通常是毫秒 ms 级别)。当并发量增大时,大量的数据库连接和数据传输会消耗大量的网络带宽和服务器资源。将缓存服务(如 Redis)部署在离应用服务器更近的网络位置,甚至直接部署在应用服务器上,可以消除访问远程数据库带来的网络延迟。绝大多数读请求可以直接命中缓存,避免流量直接涌向后端数据库,从而减轻了数据库服务器、以及它们之间的网络 I/O 压力。
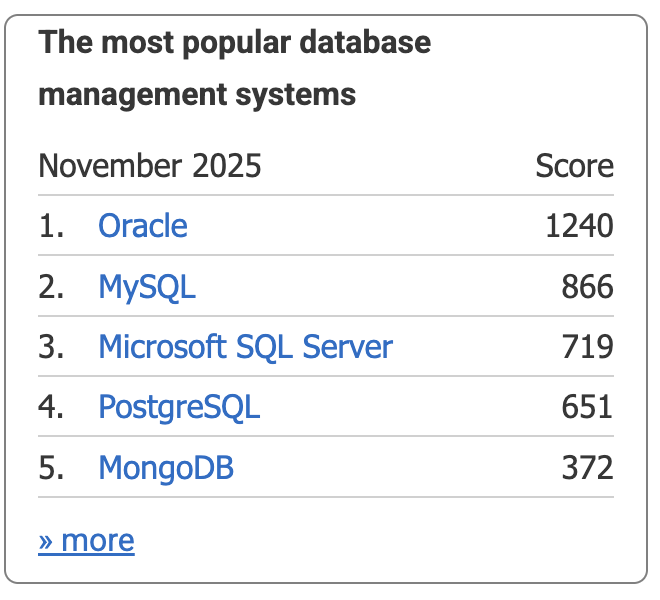
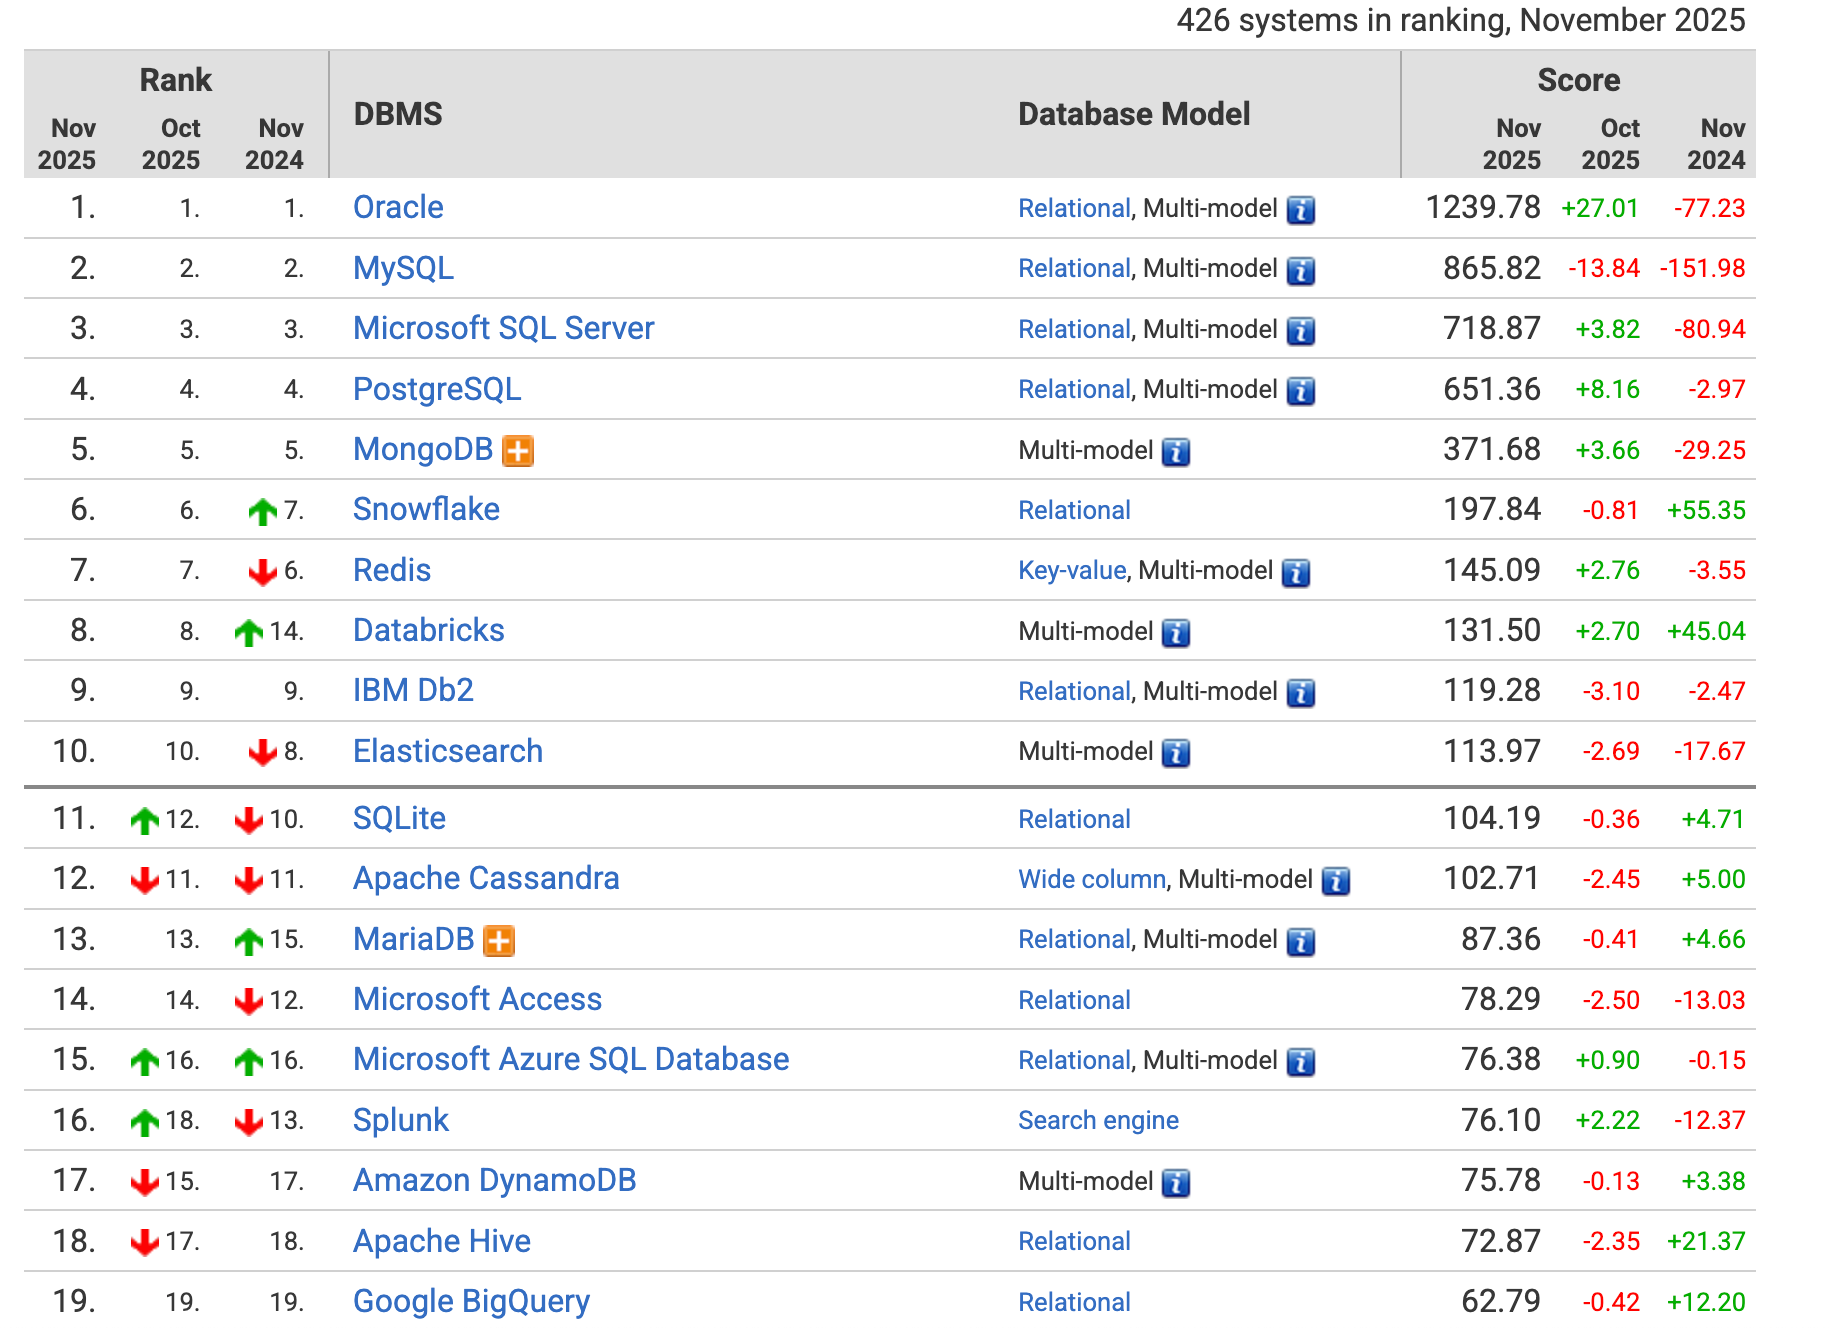
4.DB-Engines网站
网址:https://db-engines.com/en/
DB-Engines 网站是一个非常重要的资源,主要提供关于数据库管理系统(DBMS)的排名、趋势和详细信息。涵盖几乎所有类型的数据库,包括关系型、NoSQL(键值、文档、图、时序等)、多值数据库等。DB-Engines 的排名是其最著名的产物。这个排名并非基于纯粹的性能测试或市场份额数据,而是基于一个综合性的计算模型,它试图衡量一个数据库系统在社区中的流行程度(popularity)。
DB-Engines 的排名得分是基于以下四个公开可获取的指标综合计算得出的:
- 搜索引擎结果数(Google Trends): 衡量包含 DBMS 名称的网页数量。这代表了该系统在网络上的讨论热度。
- Google Trends 搜索兴趣: 衡量用户在 Google 上搜索该 DBMS 名称的频率。
- 技术讨论论坛提及数(Stack Overflow/DBA Stack Exchange): 衡量该 DBMS 在专业技术问答社区中被提及和讨论的活跃度。
- 职位招聘数量: 衡量全球招聘信息中提及该 DBMS 的数量。这代表了该系统在商业应用和劳动力市场中的需求。
下面是2025.11.09的截图
键值对数据库排名:
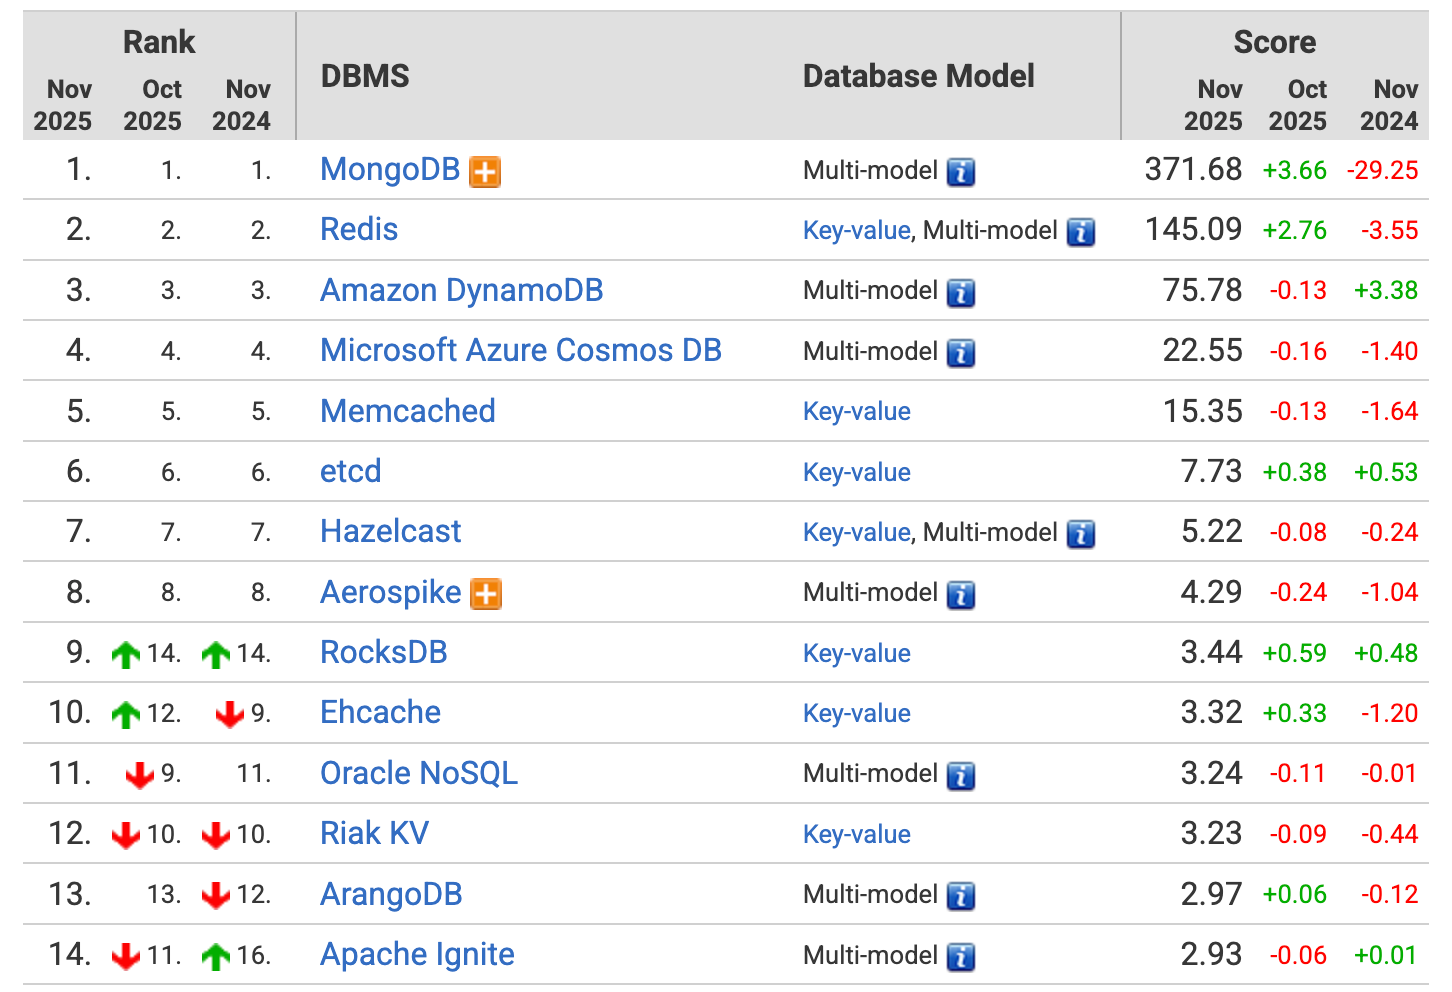
网站对于数据库的指标罗列是非常全的,甚至权威到可以用来写标书。
5.Redis概述
可以简单认为服务器读取Redis比读取Mysql快100倍左右。

https://db-engines.com/en/system/Redis
最新版本: 7.2.5, May 2024
实现语言: C
集群:Sharding
数据一致性:最终一致性,Eventual Consistency。如果速度不关键,不一定要用redis。
Redis(REmote DIctionary Server,远程字典服务器)是一种非常流行的开源、高性能的内存键值(Key-Value)存储系统。
它常被用作应用程序缓存、快速数据库或消息代理。
Redis 将所有数据存储在计算机主内存(RAM)中,而不是传统的磁盘上。内存寻址速度远高于磁盘,因此 Redis 能够实现微秒(\(\mu s\))级别的低延迟读写操作,速度极快,解决了磁盘 I/O 带来的瓶颈。非常适合用作缓存系统(将热点数据从慢速数据库迁移出来)、会话存储(分布式Session)、排行榜等需要快速响应的场景。
SQL与NoSQL
SQL (关系型数据库):如 MySQL、Oracle、SQL Server 等,其核心在于结构化(Structured)和表结构。
【1】结构化:数据以行 (Row) 和 列 (Column) 组成的二维表形式存储。在存储数据之前,必须预先定义好严格的表结构。每一列都有固定的名称、数据类型和约束(比如主键、唯一性约束、非负约束等等)。面对高并发和海量数据时,垂直和水平扩展(分库分表)难度较大。修改表结构(如增加一列)通常需要较长时间,尤其是在数据量大时。
NoSQL (非关系型数据库):(Not Only SQL)数据库是为了解决关系型数据库在海量数据、高并发、灵活数据结构等方面的不足而诞生的。
非结构化:数据模型灵活多样,不强制要求固定的表结构。
NoSQL 常见的几种数据模型:
- Key-Value 键值对模型 (如 Redis、Memcached)
- Document 文档模型 (如 MongoDB、Couchbase):数据以文档(Document)形式存储,通常是 JSON、BSON 或 XML 格式。与面向对象的编程语言天然契合,数据结构灵活,易于存储复杂对象。
- Graph 图形模型 (如 Neo4j):数据以节点(Nodes)和边(Edges/Relationships)的形式存储。擅长处理实体之间复杂的关系和连接查询(例如社交网络关系、推荐系统)。
【2】从数据关联的角度
关系型数据库(如 MySQL, PostgreSQL, Oracle)的设计基石是关系代数,其核心目标是高效、完整地存储和管理关联性强的数据,并确保数据在多个表之间的一致性。外键是 SQL 维护关联关系的核心机制。外键用于连接两个表,它指向另一个表的主键。数据库本身(而非应用层)会维护外键约束。例如,如果尝试删除一个被外键引用的用户,数据库会阻止该操作,或根据级联规则(Cascade)自动删除相关记录,从而强制保证数据的一致性和关联的有效性。可以通过 JOIN 语句,可以实时、高效地根据外键在多个表之间查询关联数据。数据高度规范化,无冗余,一致性高,支持复杂的跨表查询和事务。当需要查询一个实体的完整信息时(如“某个用户和他的所有订单”),必须执行 JOIN 操作,这在大规模并发和海量数据下,会成为性能瓶颈。扩展时,跨机器的 JOIN 非常困难。
非关系型数据库(如 MongoDB 文档型、Cassandra 宽列型)的设计目标是高可用性、水平扩展性和快速读写,通常以牺牲严格的关联和一致性为代价。通常采用反规范化,将原本属于不同表的数据冗余地存储在同一个数据对象(如文档)中。大多数 NoSQL 数据库在底层没有外键的概念,数据库本身不负责维护数据间的引用关系和完整性。如果应用需要维护关联,这个责任就完全落在了应用层。应用代码必须确保当一个用户修改了姓名时,所有包含该冗余姓名的订单文档也需要被更新。如果被冗余存储的字段(如用户姓名)发生变化,需要执行多次写入操作去更新所有包含该冗余信息的文档(即最终一致性问题)。不支持复杂的 JOIN 操作,需要通过应用层逻辑或两次查询来实现关联查询。但是,每个文档(或 Key-Value)是独立的,非常容易分散到多台机器上(水平扩展)。单个文档的结构变化不影响其他文档。获取一个实体的大部分数据通常只需要一次查询,消除了耗时的 JOIN 操作。
【3】从数据库查询语句的角度
SQL 是一种高度标准化、声明式(Declarative)的语言。
无论使用 MySQL、PostgreSQL 还是 SQL Server,核心的 SELECT、INSERT、UPDATE、DELETE 语法都是通用的,开发者可以跨数据库快速迁移知识。比如:
1
2
3
4
5
-- 查询:从Users表中,找出年龄大于25,并按姓名排序的记录
SELECT id, name, age
FROM Users
WHERE age > 25
ORDER BY name ASC;
用户声明他们想要什么结果(SELECT id, name),而不必告诉数据库如何获取这个结果(数据库的查询优化器会自行决定最佳的执行路径)。
Nosql语言不统一,通常是针对特定数据模型设计的 API 或命令集,或是模仿 SQL 的查询语言。比如:
- 键值对 (Redis):主要是命令式(Imperative),基于简单的命令(Commands)。
1
GET user:1  -- 命令式:精确指定要执行的动作
- 文档型 (MongoDB):使用基于 JSON 的查询语言(MongoDB Query Language, MQL)。
1
2
// MQL 示例:从 users 集合中查找 age > 25 的文档
db.users.find({ age: { $gt: 25 } })
- 图数据库 (Neo4j):使用专门的语言如 Cypher。
1
2
3
// Cypher 示例:查找节点 B 和节点 A 之间的关系
MATCH (a:User {name: 'Alice'})-[:FRIENDS_WITH]->(b:User)
RETURN b.name
- Search 搜索引擎型 (Elasticsearch),用RESTful API进行查询
示例:elasticsearch GET http://localhost:9200/users/1。通过 HTTP API 的形式,使用 GET、POST 等动词和 URL 路径来操作数据,通常用于全文检索和复杂聚合分析。
【4】从事务(Transaction)的角度
事务保证一组操作要么全部成功,要么全部失败。
SQL 关系型数据库(如 MySQL、PostgreSQL)将 ACID 特性作为其设计的基本要求。
- 原子性 (Atomicity):事务中的所有操作要么全部完成,要么全部不完成。如果事务中任何一步失败,所有已完成的操作都将被回滚到事务开始前的状态。
- 一致性 (Consistency):事务必须使数据库从一个有效状态转换到另一个有效状态。它确保了数据的完整性约束(如外键、唯一性约束)不会被破坏。
- 隔离性 (Isolation):并发执行的事务之间互不干扰。每个事务都感觉自己是系统中唯一在运行的事务。
- 持久性 (Durability):一旦事务被提交,它对数据库的改变就是永久性的,即使发生系统故障(如断电)也不会丢失。
SQL 数据库通过复杂的锁定机制(如行锁、表锁)和日志系统(如 Redo Log, Undo Log)来严格保证 ACID。在金融、库存管理、订单处理等需要强一致性的业务场景中不可替代。为了维护严格的隔离性和一致性,事务会引入锁的竞争和等待,在高并发环境下会牺牲一部分性能和水平扩展性。
NoSQL 数据库(如 Cassandra、MongoDB、Redis)的设计目标是高性能、高可用性和可扩展性(Scale Out),因此它们通常放宽了对强一致性(尤其是隔离性)的要求,采用了 BASE 模型。
A. BASE 原则
BASE 是对 ACID 的反向总结,是分布式系统常用的设计原则:
- 基本可用性 (Basically Available):系统保证在任何情况下都能对外提供服务,允许响应时间延长或返回非最新数据。
- 软状态 (Soft State):系统状态可以随着时间流逝而发生改变,不要求实时的一致性。
- 最终一致性 (Eventually Consistent):系统中的数据复制需要时间,但在没有新的更新操作时,经过一段同步时间后,所有副本的数据最终会达到一致状态。
B. NoSQL 中的事务与一致性
- Key-Value (Redis):
- 事务:Redis 提供了有限的事务(使用
MULTI和EXEC命令),但它不具备 ACID 的回滚能力(即原子性保障较弱,如果命令执行失败,已执行的命令不会回滚)。 - 一致性:通常是最终一致性,但在单节点下可以保证操作的顺序性。
- 事务:Redis 提供了有限的事务(使用
- 文档型 (MongoDB):
- 单文档操作:MongoDB 保证单个文档的 CRUD 操作是原子性的。
- 多文档事务:较新的版本开始支持多文档 ACID 事务,但实现机制复杂且性能开销大于 SQL,常用于解决跨文档操作的原子性问题,但并非其主要优势。
- 一致性:支持不同级别的读写关注(Read/Write Concern)配置,允许用户在一致性和性能/可用性之间进行选择。
- 宽列/图数据库 (Cassandra):
- 事务:通常只保证行级别的操作原子性。
- 一致性:默认是最终一致性,为了实现高可用和水平扩展,牺牲了强一致性。
通过放弃严格的 ACID 保证,减少了锁竞争和同步开销,极大地提高了系统的并发处理能力和水平扩展性。开发者必须在应用层处理数据可能存在的暂时不一致状态。
redis的用途
(1)缓存系统(将热点数据从慢速数据库迁移出来)
(2)会话存储(分布式Session)

在分布式多服务器环境下,由于用户会话(Session)被存储在单个服务器的本地,当后续请求被路由到其他服务器时,无法共享 Session 信息,导致用户被迫退出或登录失败。
为了解决这个问题引入redis:将原本分散存储在 服务器A 和 服务器B 本地的 Session 数据,统一迁移到 Redis 集群(一个独立于应用服务器的高速、内存型数据存储)。
用户登录请求到达 服务器A 后,服务器A 不再将 Session 存储在本地,而是将 Session ID 和对应的用户信息写入 Redis。服务器A 会将这个 Session ID (通常通过 Cookie 或 Token) 返回给用户浏览器。
用户后续的请求到达 服务器B。请求中携带着之前由服务器A发出的 Session ID。服务器B 接收到请求后,会使用这个 Session ID 向 Redis 发起查询。Redis 快速返回对应的 Session 数据。服务器B 成功验证用户身份,请求得以继续执行。
Redis 作为一个共享的、中央存储库,确保了所有应用服务器都能访问到相同的 Session 数据。
Redis 是一个内存数据库,读写速度极快,这对于对性能要求高的 Session 操作至关重要。
通过 Redis 集群和数据复制,可以避免因为单个应用服务器故障而丢失 Session 的风险。
引入 Redis 后,应用服务器(A和B)自身不再需要维护用户状态,变得无状态。这样它们可以轻松地水平扩展,增加更多的服务器(C、D、E…),而不会遇到图中的 Session 丢失问题。
(3)分布式锁:可以利用 Redis 来实现对共享资源的互斥访问,这就是 分布式锁 的基本概念。

在分布式系统中,当多个独立的服务器需要同时修改或访问同一个共享资源(例如扣减库存、更新数据库记录)时,如果不加控制,就可能发生竞态条件(Race Condition)和数据不一致的问题。
谁先在 Redis 中成功设置了代表“锁”的 Key,谁就获得了对共享资源的独占访问权(即“先拿先用”)。
服务器A 完成操作后,必须向 Redis 发送请求(使用 DEL 命令)将这个 Key 删除,从而释放锁。否则,其他服务器将永远无法获取锁。
如果在服务器A持有锁期间发生崩溃,导致它无法释放锁,就会造成 死锁。解决方法是,在设置锁 Key 时必须同时设置一个 过期时间(Expiry Time / TTL)。即使服务器A崩溃,Redis 也会在一段时间后自动删除这个 Key,从而保证锁能够最终被释放。
(4)限流
(5)结合Lua脚本,实现多个操作的原子性,避免数据不一致性。
当涉及到分布式锁的释放时,仅仅使用 DEL 命令是不够安全的,因为存在一个时间差(Time Gap)可能导致数据错误。Lua 脚本就是用来解决这个问题的。
在分布式锁中,我们需要确保“检查锁的归属权”和“删除锁 Key”这两个操作是原子性的,它们必须作为一个整体被执行。
Redis 保证所有发送到服务器的 Lua 脚本都会被当作一个单一的、不可分割的原子操作来执行。
比如下面的Lua脚本:
1
2
3
4
5
6
7
8
9
10
-- KEYS[1] 是锁的 Key (例如: mylock)
-- ARGV[1] 是请求锁时设置的、代表当前服务器的唯一标识值 (例如: serverA_id)

if redis.call("get", KEYS[1]) == ARGV[1] then
    -- 只有当前锁的值等于我设置的值时,才删除它
    return redis.call("del", KEYS[1])
else
    -- 锁已过期或已被其他服务获取,不执行删除操作
    return 0
end
Redis 一次性执行整个 Lua 脚本,确保了“检查(GET)”和“删除(DEL)”这两个关键步骤不会被其他任何操作打断。
服务器 A 只能删除它自己设置的锁。如果锁在 A 的操作期间过期了,那么锁的值已经被服务器 B 修改(或刷新),A 的脚本会发现 redis.call("get", KEYS[1]) 的值不再是 ARGV[1](serverA_id),从而安全地跳过删除操作,避免了误删服务器 B 的锁。
丰富的数据结构
与其他仅支持简单字符串的键值存储不同,Redis 支持丰富的数据结构,这使其功能更加强大和灵活:
| 数据结构 | 描述 | 典型应用 |
|---|---|---|
| String (字符串) | 最基本的数据类型,可以存储文本、数字或二进制数据。 | 缓存对象、计数器(如点赞数) |
| Hash (哈希) | 类似于字典或对象,在一个键下存储多个字段和值。 | 存储用户信息、对象数据 |
| List (列表) | 有序的字符串列表,可以从头部或尾部添加/删除元素。 | 消息队列、最新动态列表 |
| Set (集合) | 无序的、不重复的字符串集合。 | 社交关系(共同好友)、标签系统 |
| Sorted Set (有序集合) | 集合中的每个成员都会关联一个分数(Score),成员按分数排序。 | 排行榜 |
尽管 Redis 是内存存储,但它提供了将数据持久化到磁盘的机制,以防止服务器宕机时数据丢失:
- RDB (Redis Database): 定期将内存中的数据快照(Snapshot)写入磁盘。
- AOF (Append Only File): 记录所有对 Redis 数据的修改操作命令,以日志形式追加到文件中。
此外,Redis 还支持:
- 主从复制 (Replication): 将数据从主节点同步到多个从节点,用于读写分离和数据冗余。
- Sentinel (哨兵): 监控 Redis 实例的运行状态,并提供自动故障转移能力,实现高可用。
- Cluster (集群): 自动在多个节点之间分片(Sharding)数据集,提高性能和可扩展性。
redis和memcached的区别
| 特性 | Redis (REmote DIctionary Server) | Memcached (Memory Cache Daemon) |
|---|---|---|
| 数据结构 | 丰富多样: 支持 String、Hash、List、Set、Sorted Set 等。 | 单一简单: 仅支持最简单的 String(键值对)。 |
| 持久化 | 支持: 提供 RDB(快照)和 AOF(日志)两种方式,可将数据从内存同步到磁盘。 | 不支持: 所有数据完全存储在内存中,服务重启或宕机,数据会丢失。 |
| 内存管理 | 采用更灵活的内存管理机制(基于包装的 malloc/free),能支持复杂的结构。 |
采用Slab Allocation(内存块分配),对内存利用率更高,但结构单一。 |
| 复制/高可用 | 支持: 提供主从复制(Replication)和 Sentinel(哨兵)机制。 | 不支持: 仅能通过客户端或外部工具实现分布式。 |
| 事务性 | 支持: 通过 MULTI/EXEC 命令实现简单的事务原子性。 |
不支持。 |
| CPU 模型 | 单线程模型:保证了操作的原子性,避免了上下文切换开销。 | 多线程模型:可以利用多核 CPU 处理网络 I/O。 |
| 使用场景 | 通用性强: 缓存、队列、排行榜、计数器、实时应用。 | 纯粹缓存: 简单键值存储和读取。 |
Redis 在处理 JSON 或复杂数据时,其设计更具优势:
Memcached 只支持 String 类型。当你在 Memcached 中存储一个 JSON 对象时,它必须先被序列化(例如,使用 JSON.stringify 转换为字符串),然后整个字符串作为一个 Value 存储。必须读取整个 JSON 字符串,然后在应用端进行反序列化(例如,JSON.parse)才能操作其中的字段。如果只想修改 JSON 对象中的一个字段(例如用户的邮箱),必须将整个 JSON 字符串取出 \(\rightarrow\) 反序列化 \(\rightarrow\) 修改字段 \(\rightarrow\) 重新序列化 \(\rightarrow\)存回缓存。这个过程涉及多次网络 I/O 和 CPU 密集型操作。
Redis 提供了 Hash(哈希)数据类型,非常适合存储对象(如 JSON)。当存储一个 JSON 对象时,可以将其转换为 Redis Hash:
- 键(Key)对应 JSON 对象。
- Hash 的字段(Field)对应 JSON 对象的属性。
- Hash 的值(Value)对应 JSON 属性的值。
可以使用 HGET 命令只获取对象中的某个字段,无需读取整个对象并反序列化。可以使用 HSET 命令只修改对象中的某个字段,无需取出整个对象,极大地减少了网络流量和应用端的 CPU 开销。此外,Redis 还有专门的 RedisJSON 模块,可以直接存储和操作 JSON 数据—-【计算向数据移动】
单线程
【注意】redis6 引入了多线程。
单线程,每个命令都具备原子性。
【1】单线程设计原因:
- Redis 的操作是基于内存的,其大多数操作的性能瓶颈主要不是 CPU 导致的
- 使用单线程模型,代码简便的同时也减少了线程上下文切换带来的性能开销
- Redis 在单线程的情况下,使用I/O多路复用模型就可以提高 Redis 的 I/O 利用率了
注:所说的 Redis 单线程,主要指的是 Redis 网络 I/O 和键值对读写这些操作是由一个线程完成的。(持久化、集群等机制其实是有后台线程执行的) 不过 Redis 并不是一直都单线程的,在 4.0 之后就开始引入了多线程指令,6.0 之后便正式引入了多线程的机制,不过 这里的多线程其只是针对网络请求过程使用多线程,其对于数据读写命令的处理依旧是单线程的。
【2】6.0 版本引入多线程的原因
随着数据规模的增长、请求量的增多,Redis 的执行瓶颈主要在于网络 I/O。引入多线程处理可以提高网络 I/O处理速度。
为什么 Redis 前期不使用多线程的方式,等到 6.0 却又引入呢?
主要是因为对 Redis 的性能有了更高的要求,因为随着业务愈加复杂,公司需要的 QPS 就越高了,为了提升 QPS,最直接的做法就是搭建 Redis 的集群,即提高 Redis 的机器数,但是这种做法的资源消耗是巨大的。
而 Redis 单线程执行命令的性能瓶颈在网络 I/O,虽然它采用了多路复用技术,但 I/O 多路复用模型本质还是同步 I/O。
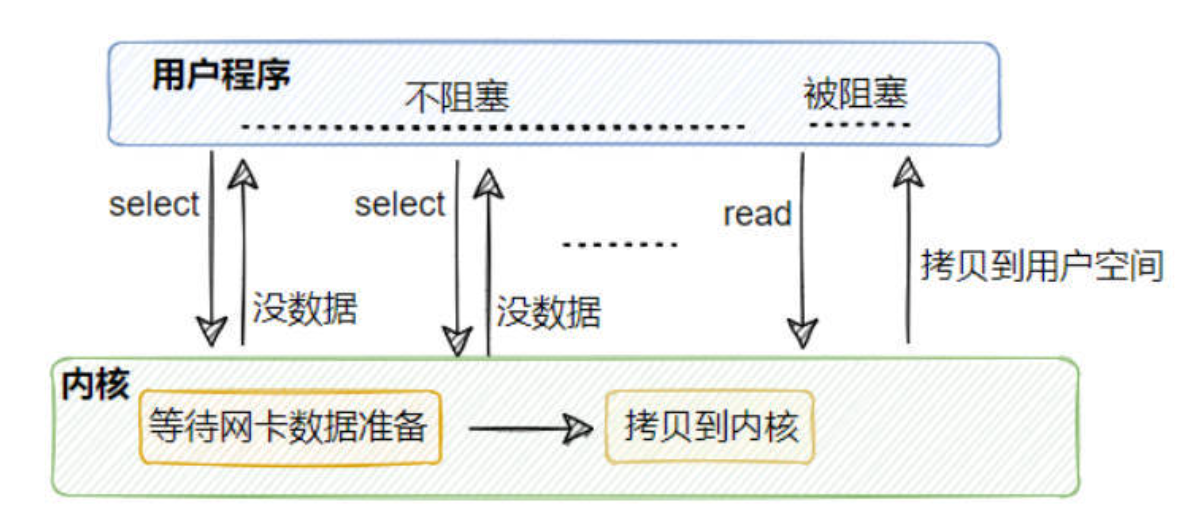
从上面这个图中可以看到,I/O多路复用在处理网络请求的时候,其调用 select(或是 epoll 等)后,如果来数据了,那么将数据从内核拷贝到用户空间这一步是同步的,即用户线程需要等待数据拷贝完成 (在 redis 场景就是无法处理命令了),如果并发量很高的话,这个过程可能会成为瓶颈。 综上所示,多路复用+单线程的设计并不能很好地解决网络I/O瓶颈的问题,这个时候就可以考虑利用 CPU的多核优势,即利用多线程处理网络请求的方式来提高效率,然后对于读写命令,Redis 依旧采用单线程命令。
【3】Redis 引入多线程之后,有没有带来什么线程安全问题呢?
没有,因为 Redis 6.0 只有针对网络请求模块采用的是多线程,对于读写命令部分还是采用单线程,所以所谓的线程安全问题就不存在了。 Redis 6.0 的多线程默认是禁用的,只使用主线程,因为大部分公司并发量实际上还是用不上这个。
如果要开启,需要配置 io-threads-do-reads 参数为 yes 。开启多线程后,还需要设置线程数,否则是不生效的。同样需要修改 redis 配置文件 redis.conf: io-threads。官网建议4核的机器建议设置为2或3个线程,8核的建议设置为6个线程
redis为什么这么快
【基于内存、单线程事件驱动模型+IO多路复用、编码】
- (最重要)Redis 完全基于内存存储,相比于磁盘IO,不论是寻址,还是带宽,内存都很快。提供快速的读写速度,相比于传统的磁盘数据库,内存访问速度快得多。磁盘中寻址ms/微妙级别,带宽MB/s,GB/s;内存寻址ns(纳秒)级别,比磁盘快10万倍,带宽很大。
- Redis 使用单线程事件驱动模型结合 I/O 多路复用(如
Epoll,Select/Poll),避免了多线程上下文切换和竞争条件,提高了并发处理效率。单线程模型避免了多线程之间的上下文切换开销,以及因锁竞争导致的性能损耗。I/O 多路复用使得单个线程可以在高并发场景下,同时监听大量的网络连接,在等待I/O的过程中不被阻塞,从而在网络 I/O 密集型场景下实现了高效的并发处理。(但是,是同步IO) - Redis 提供多种高效的数据结构 (如字符串、哈希、列表、集合等),这些结构经过优化,能够快速完成各种操作Redis 内部提供了多种经过高度优化的底层数据结构。这些数据结构的设计目标就是为了保证大多数操作的时间复杂度为 O(1) 或 O(log N)(例如,哈希表的查找是 O(1),跳跃表的查找是 O(log N)),从而保证了操作效率。
- redis源码基于C语言编写,其编写规范等等业界都很认可。C语言编译后能生成高效的机器码,且 Redis 的代码库质量高,工程实现精简且出色
6.redis安装
环境:纯净centos7.5,镜像是CentOS-7.5-x86_64-DVD-1804.iso
CentOS 是一种基于 Red Hat Enterprise Linux (RHEL) 的发行版,属于 RPM 系列(使用 .rpm 包文件格式)。
CentOS/RHEL 使用 YUM 或 DNF 作为其主要的包管理器,它们依赖于 RPM 包进行安装、更新和管理。
APT (Advanced Packaging Tool) 是 Debian/Ubuntu 等 DEB 系列发行版使用的包管理器。
https://redis.io/docs/latest/operate/oss_and_stack/install/install-stack/
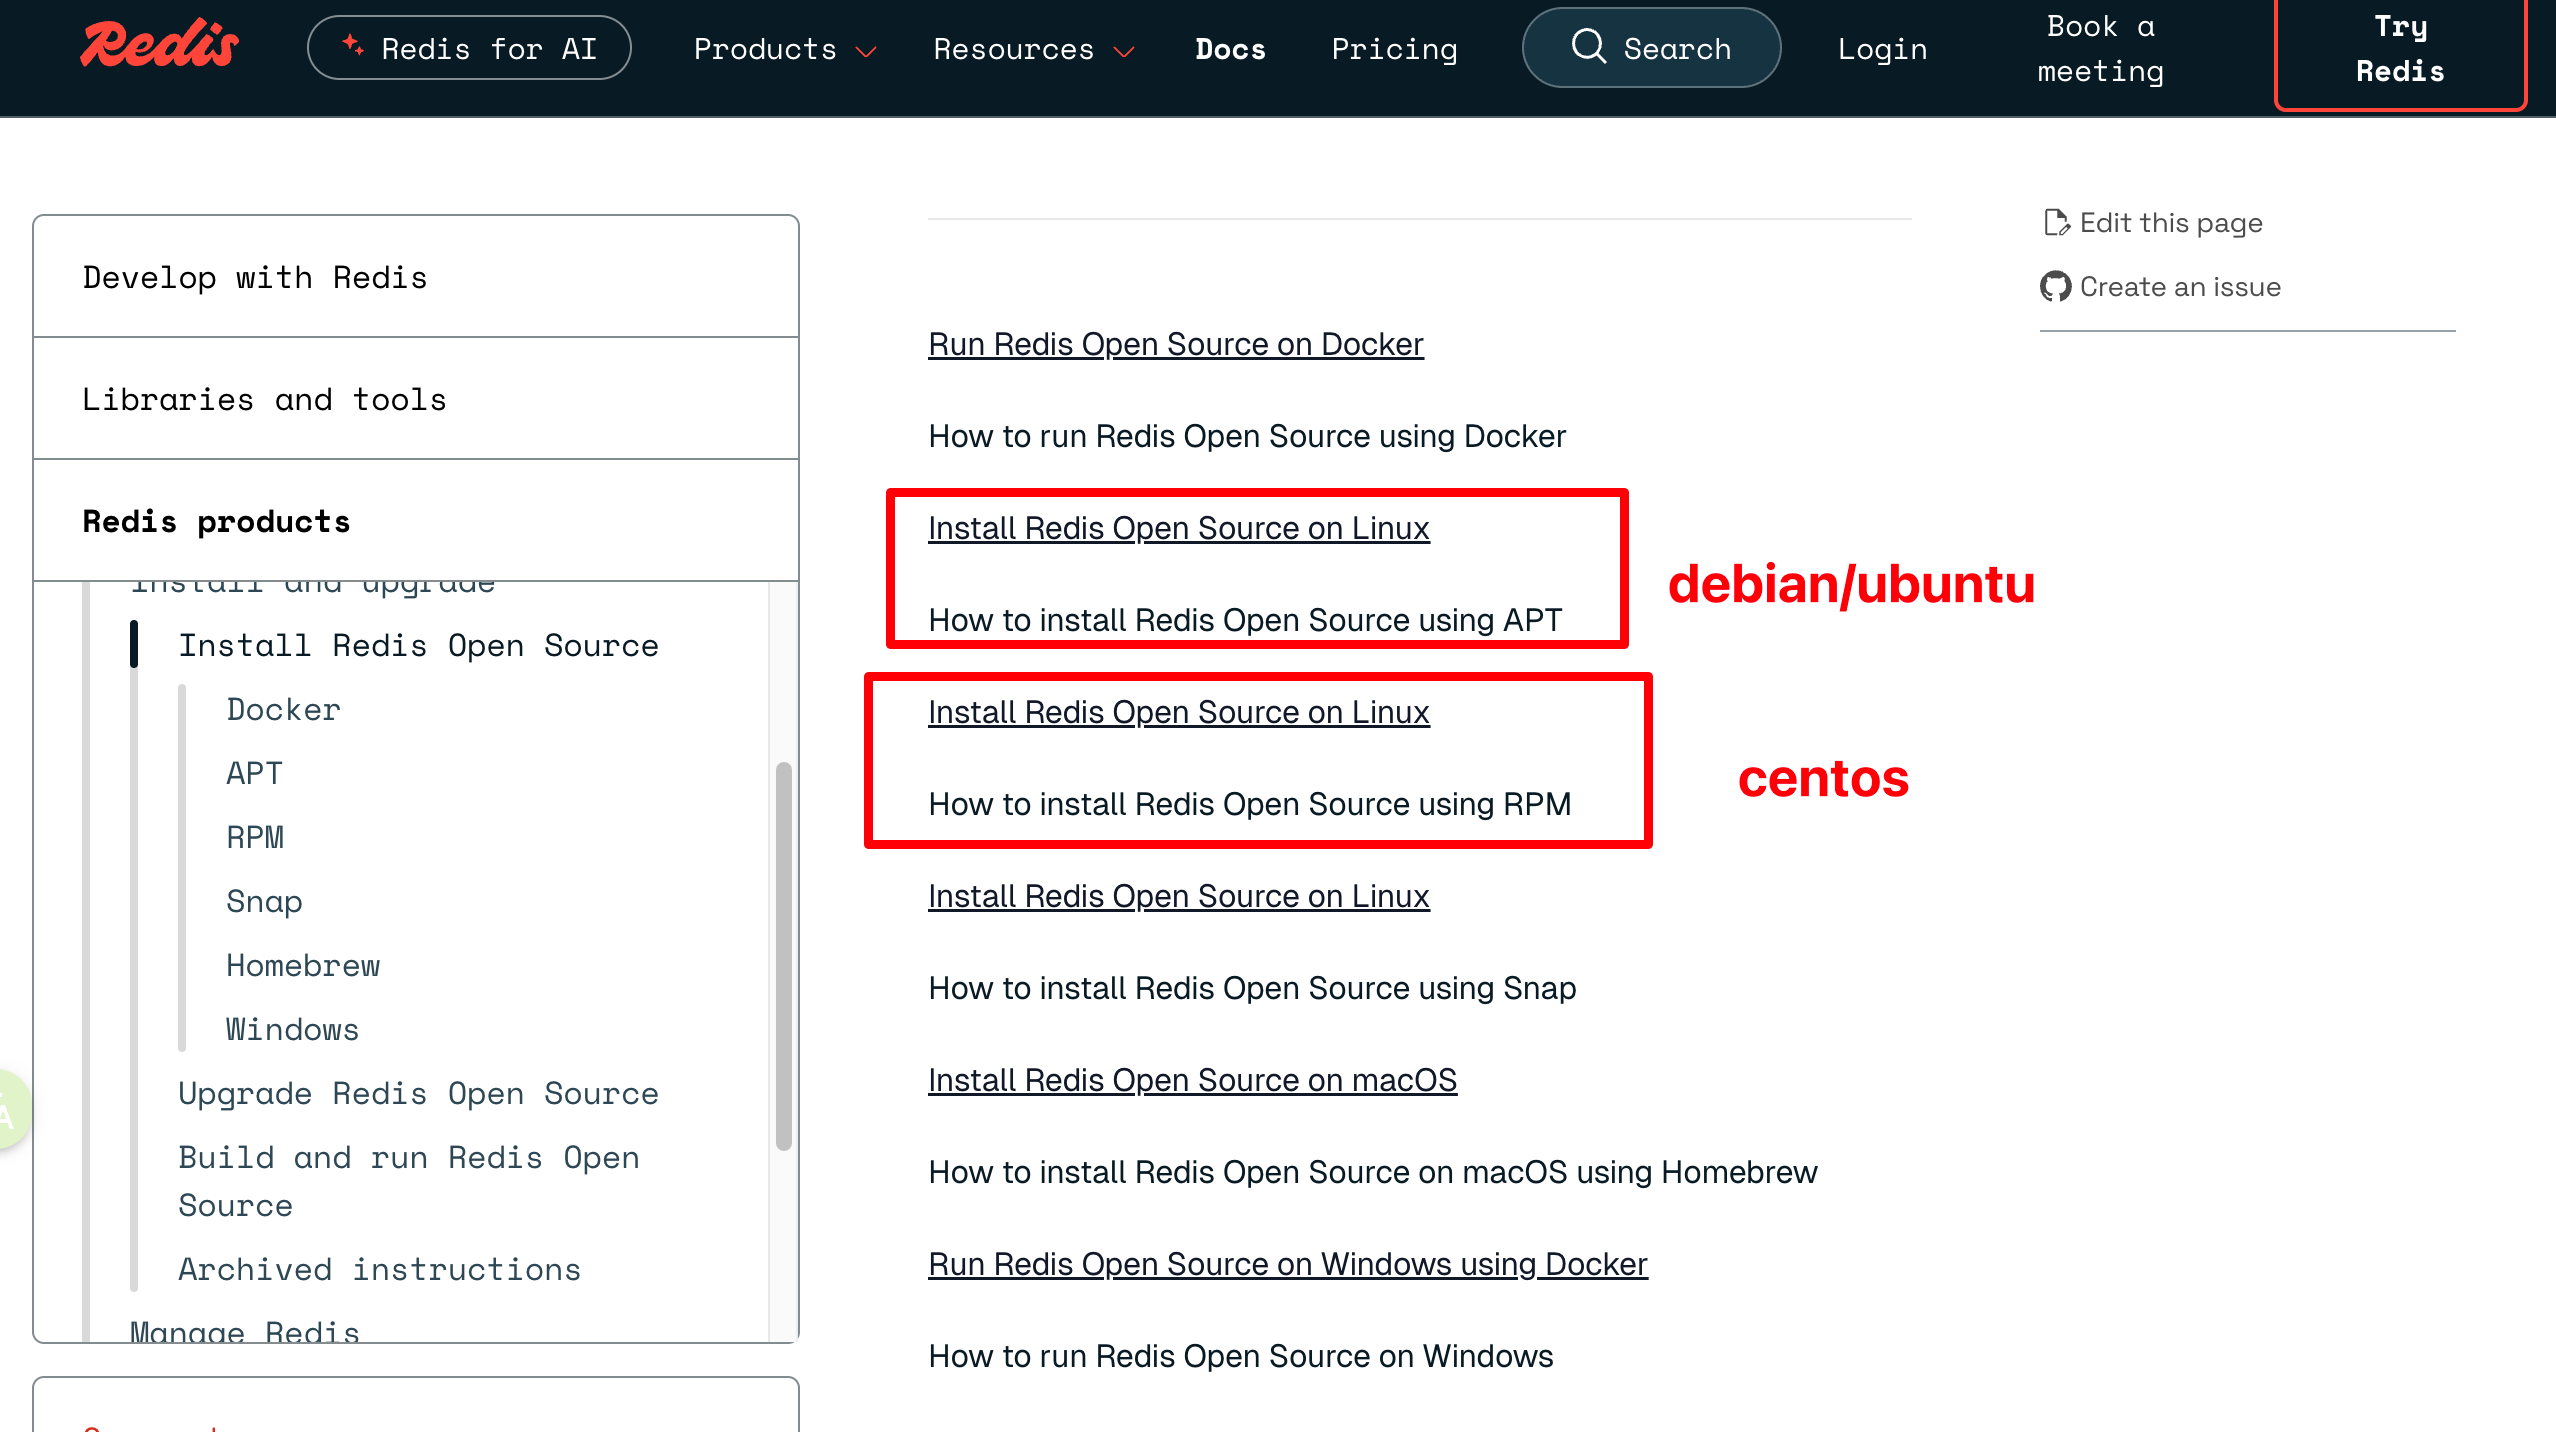
因为我用的是centos,所以安装细节参考:https://redis.io/docs/latest/operate/oss_and_stack/install/install-stack/rpm/
如果是Debian或者ubuntu,参考:https://redis.io/docs/latest/operate/oss_and_stack/install/install-stack/apt/
方法1:
在 CentOS 7.5 上安装 Redis,最推荐且最稳定的是使用 EPEL (Extra Packages for Enterprise Linux) 仓库 或 从源代码编译安装。下面推荐使用 EPEL 仓库安装。由于 Redis 经常包含在 EPEL 仓库中,这是最简单且最稳定的方式。
首先,安装 EPEL 仓库配置,因为 Redis 包通常在其内:
1
sudo yum install epel-release
使用 yum 命令从 EPEL 仓库安装 Redis:
1
sudo yum install redis
安装完成后,启动 Redis 服务并设置开机自启:
1
2
sudo systemctl start redis
sudo systemctl enable redis
检查状态:
1
sudo systemctl status redis
备注通过ssh连接centos:
然后输入密码。
停止 Redis 服务并禁用开机自启:
1
2
3
4
5
# 停止 Redis 服务
sudo systemctl stop redis

# 禁用 Redis 开机自启
sudo systemctl disable redis
使用 yum remove 命令卸载 Redis 主程序包。为了确保卸载干净,最好同时使用 yum autoremove 来移除 Redis 安装时作为依赖项安装的软件包(例如 jemalloc)。
1
2
3
4
5
6
# 卸载 Redis 软件包
sudo yum remove redis

# (可选,推荐)自动移除不再被任何软件包需要的依赖项
# 这一步会移除 jemalloc.x86_64 0:3.6.0-1.el7
sudo yum autoremove
使用 yum 卸载只会移除程序文件,但通常会保留配置文件、日志文件和持久化数据文件。需要手动删除这些残留文件以实现完全卸载。
注意: 这一步会删除 Redis 数据。
如果需要,可以清理 YUM 缓存。
1
sudo yum clean all
方法2:多实例配置
下面介绍另外一种方式安装:这种安装方式虽然比使用 yum 仓库复杂,但能确保安装到特定版本,并对安装路径有完全的控制权。
阶段一:准备工作与下载
确保系统安装了 wget,这是通过命令行从互联网下载文件的常用工具。
1
yum install wget
切换到当前用户的主目录(例如 /home/apple/ 或 /root/),作为后续操作的基准目录。
1
cd ~
创建一个名为 soft 的目录,用于存放下载的 Redis 源码包,保持文件组织整洁。
1
2
mkdir soft
cd soft
从 Redis 官网下载某个版本(比如 5.0.5等等) 版本的 Gzip 压缩包。
现在最新版本是7.2.5
下面这个地址的格式7.2.5可以用,5.0.5也可以。应该是通用的。
1
wget http://download.redis.io/releases/redis-7.2.5.tar.gz
使用 tar 命令解压下载的压缩包。解压后会得到一个名为 redis-7.2.5 的目录。然后进入到 Redis 的源代码目录。
1
2
tar xf redis-7.2.5.tar.gz
cd redis-7.2.5
阅读README.md。这是一个好习惯。查看 README.md 文件通常可以了解编译、配置和安装的最新、最准确的指示。
1
2
3
cat README.md
或者
vi README.md
README.md内容在最后我复制出来了。
阶段二:编译与安装
运行 make 开始编译过程。
1
make
如果系统没有安装 GCC (GNU Compiler Collection),make 命令会失败。CentOS 6.x 可能需要先安装 GCC,这是 C 语言程序的编译器。
1
yum install gcc  (没有报错就不需要安装)
如果第一次 make 失败,需要运行 make distclean 来清除之前编译失败留下的所有中间文件和配置,确保第二次编译是全新的开始。
1
make distclean  (没有执行yum install gcc ,那么这一步也不需要执行)
在安装 GCC 并清理后,再次运行 make。这次应该能成功编译出所有的可执行文件。
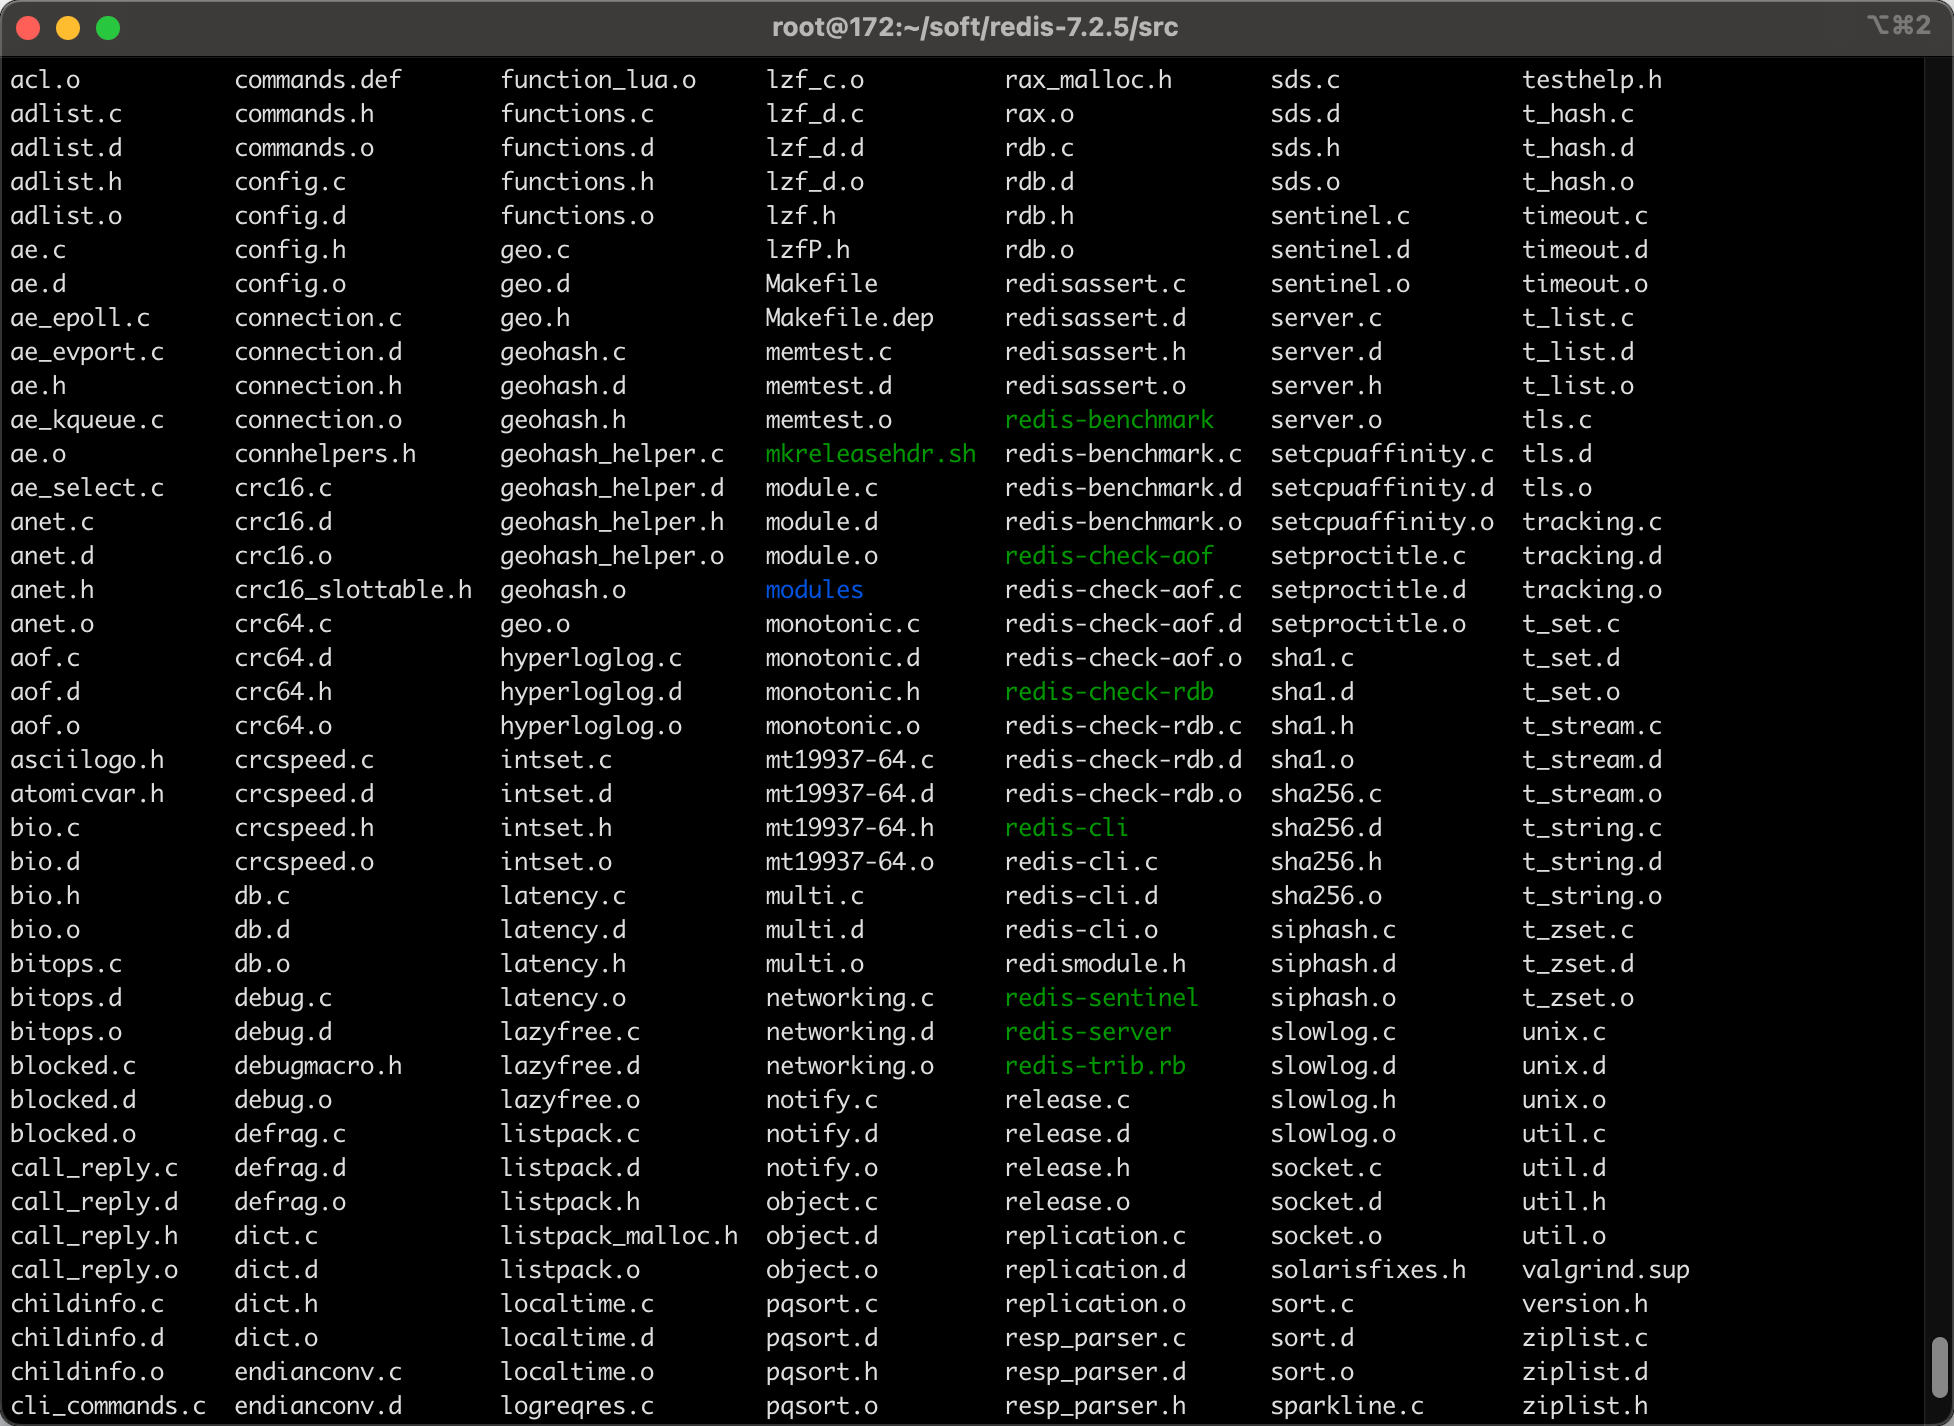
编译成功后,所有的可执行文件(如 redis-server, redis-cli, redis-benchmark 等)会生成在源代码目录下的 src/ 目录中。
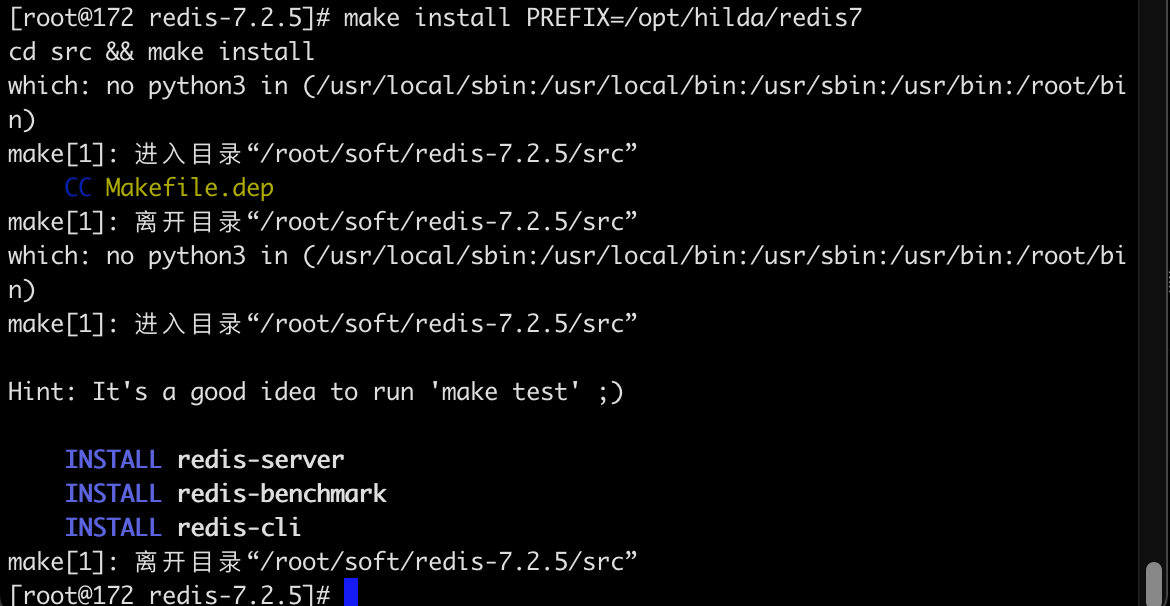
运行 make install,并使用 PREFIX 参数将编译好的程序安装到指定目录 /opt/hilda/redis7。这是一种定制化安装,使得 Redis 文件不会散落在系统目录中,便于管理和升级。
1
make install PREFIX=/opt/hilda/redis7
阶段三:配置环境变量
/etc/profile 文件用于设置系统全局的环境变量。
1
vi /etc/profile
设置一个变量指向 Redis 的安装根目录。然后需要将可执行文件路径添加到 PATH, 这样就可以在任何目录下直接执行 redis-server 或 redis-cli 等命令,而无需输入完整的路径。
1
2
export REDIS_HOME=/opt/hilda/redis7
export PATH=$PATH:$REDIS_HOME/bin
重新加载 profile 文件,使环境变量立即在当前会话中生效。
1
source /etc/profile
阶段四:配置多实例与服务化
进入工具目录。
1
cd /root/soft/redis-7.2.5/utils
运行 Redis 提供的安装脚本,用于快速配置和部署 Redis 实例作为系统服务。
1
./install_server.sh
在5.0.5版本中,这个命令可以执行,但是7.2.5出现:
1
2
3
4
5
6
[root@172 utils]# ./install_server.sh
Welcome to the redis service installer
This script will help you easily set up a running redis server

This systems seems to use systemd.
Please take a look at the provided example service unit files in this directory, and adapt and install them. Sorry!
您好,这个提示信息是 Redis 5.x 版本的 install_server.sh 脚本在 CentOS 7.x(或其他使用 systemd 的现代 Linux 发行版)上运行时给出的明确拒绝信息。
install_server.sh 脚本最初是为 CentOS 6.x 或更早版本设计的,这些系统使用老式的 SysVinit 或 Upstart 作为服务初始化系统。该脚本的主要功能就是创建 /etc/init.d/ 下的服务启动脚本。
CentOS 7.x 及更高版本已经切换到 systemd 作为其初始化系统。Systemd 使用 Unit Files(单元文件,通常以 .service 结尾)来管理服务,而不是传统的 SysVinit 脚本。
Redis 5.x 提供的这个 install_server.sh 脚本无法自动生成或正确配置 systemd Unit File。
因此,脚本检测到系统是 systemd 架构后,直接停止执行,并提示查看源码目录中提供的示例 Unit File(example service unit files),并要求手动进行安装配置。
要在 CentOS 7.5 上启动和管理 Redis,需要手动创建和配置一个 redis.service 文件,并将其放置在 /etc/systemd/system/ 目录下。
下面将使用 Redis 源码包中提供的 systemd-redis_server.service 模板来创建并启动 Redis 服务。
一个物理机可以启动多个 Redis 实例。Redis 官方考虑到多实例部署的常见需求,在 utils 目录下提供了更高级的解决方案:Systemd 模板服务。使用 Systemd 的模板服务 (systemd-redis_multiple_servers@.service) 是最优雅和推荐的方式,因为它允许您通过一个配置文件和一套命令,管理多个不同端口的 Redis 实例。redis通过端口号区分不同的redis实例。下面通过部署 Redis 7.2.5 多实例 (6379 & 6380)2个实例为例,说明。
将使用以下路径:
- Redis 可执行文件路径:
/opt/hilda/redis7/bin/ - 配置目录:
/etc/redis7/ - 数据目录基础:
/var/lib/redis7/ - 日志目录:
/var/log/redis7/
(1)准备目录和配置文件
1
2
3
4
5
6
7
# 创建配置、数据和日志目录
sudo mkdir -p /etc/redis7
sudo mkdir -p /var/lib/redis7/6379
sudo mkdir -p /var/log/redis7

# 复制源码中的配置文件到标准配置目录
sudo cp /root/soft/redis-7.2.5/redis.conf /etc/redis7/6379.conf
创建额外的配置和数据目录:需要为每个实例准备一个独立的配置文件、数据目录和日志文件。
1
2
3
4
5
6
7
8
# 复制源码中的配置文件作为 6379 的基础
sudo cp /root/soft/redis-7.2.5/redis.conf /etc/redis7/redis-6379.conf

# 复制源码中的配置文件作为 6380 的基础
sudo cp /root/soft/redis-7.2.5/redis.conf /etc/redis7/redis-6380.conf

# 创建 6380 实例的数据目录
sudo mkdir -p /var/lib/redis7/6380
(2)修改 Redis 配置文件:
必须编辑 /etc/redis7/6379.conf 文件,将其配置为适合 Systemd 启动的方式:
1
vi /etc/redis7/6379.conf
关闭守护进程模式: 必须由 systemd 负责进程管理。
1
daemonize no
设置 PID 文件路径: 供 systemd 监控进程。
1
pidfile /var/run/redis_6379.pid
设置日志文件路径: 确保日志输出到正确位置。
1
logfile "/var/log/redis7/redis_6379.log"
设置持久化数据目录: 确保 RDB/AOF 文件存放在这里。
1
dir /var/lib/redis7/6379
/var/log/redis7/redis_6380.log也是类似的配置,注意端口要修改为6380
(3)安装和配置 Systemd Unit File
复制官方模板到 Systemd 目录:将模板文件复制到 Systemd 目录,保持文件名的 @ 符号:
1
sudo cp /root/soft/redis-7.2.5/utils/systemd-redis_multiple_servers@.service /etc/systemd/system/redis@.service
注意:将其简化命名为 redis@.service,这样后续命令会更简洁。
编辑模板文件,使用 %i (实例名,即端口号) 来引用配置和路径:
1
sudo vi /etc/systemd/system/redis@.service
在 [Service] 部分,根据路径 /opt/hilda/redis7 和配置命名规则 (redis-%i.conf) 进行修改:
1
2
3
4
5
6
7
8
9
10
11
12
13
14
15
16
17
18
[Service]
# ... 其他行保持不变 ...

# ExecStart:启动时加载 /etc/redis7/redis-6379.conf 或 /etc/redis7/redis-6380.conf
# %i 在运行时会被替换为 6379 或 6380
ExecStart=/opt/hilda/redis7/bin/redis-server /etc/redis7/redis-%i.conf

# ExecStop:关闭时连接对应端口的实例
ExecStop=/opt/hilda/redis7/bin/redis-cli -p %i shutdown

# PIDFile:指向 /var/run/redis-6379.pid 或 /var/run/redis-6380.pid
PIDFile=/var/run/redis-%i.pid
# 确保与配置文件中的 pidfile 设置保持一致

User=root
Group=root

# ... 其他行保持不变 ...
(4)修改/etc/systemd/system/redis@.service中的如下内容:
将 [Unit] 部分的路径修改为实际创建的配置文件路径:
1
2
3
4
5
6
7
[Unit]
Description=Redis data structure server - instance %i
Documentation=https://redis.io/documentation
# 原文件:AssertPathExists=/etc/redis/redis_server_%i.conf
# 修复:
AssertPathExists=/etc/redis7/redis-%i.conf
# 确保断言指向 /etc/redis7/redis-6379.conf 或 /etc/redis7/redis-6380.conf
将 [Service] 部分的 Type=notify 改为 Type=simple,以确保兼容性。
1
2
3
4
5
6
7
8
9
10
11
12
13
14
15
[Service]
ExecStart=/opt/hilda/redis7/bin/redis-server /etc/redis7/redis-%i.conf
ExecStop=/opt/hilda/redis7/bin/redis-cli -p %i shutdown
PIDFile=/var/run/redis-%i.pid
User=root
Group=root
LimitNOFILE=10032
NoNewPrivileges=yes
# 原文件:Type=notify
# 修复:
Type=simple
TimeoutStartSec=infinity
TimeoutStopSec=infinity
UMask=0077
#...
(5)启动和验证多实例
1
2
3
4
5
6
7
8
9
10
11
12
13
14
15
16
17
18
19
20
21
22
# 1. 重载 systemd 配置
sudo systemctl daemon-reload

# 2. 启动 6379 实例
sudo systemctl start redis@6379

# 3. 启动 6380 实例
sudo systemctl start redis@6380

# 4. 检查两个实例的状态
sudo systemctl status redis@6379
sudo systemctl status redis@6380

# 5. 设置开机自启(可选)
sudo systemctl enable redis@6379
sudo systemctl enable redis@6380

# 禁用 6379 实例的开机自启(可选)
sudo systemctl disable redis@6379

# 禁用 6380 实例的开机自启(可选)
sudo systemctl disable redis@6380
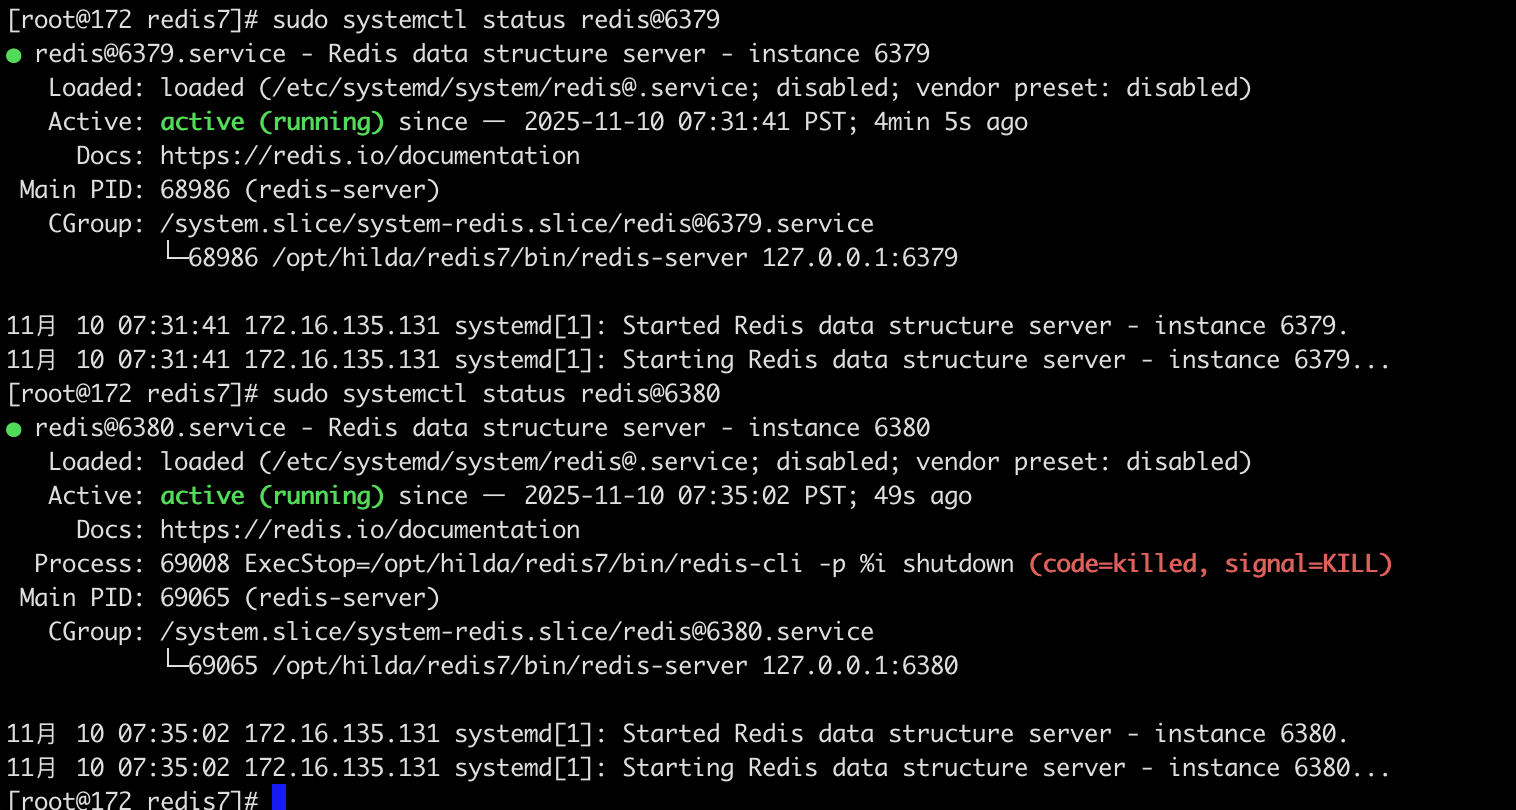
两个 Redis 实例(6379 和 6380)都成功启动并正在运行

如果要关闭实例:
1
2
sudo systemctl stop redis@6379
sudo systemctl stop redis@6380
配置修改总结(便于查阅)
1.bind绑定监听的IP地址。默认配置是 bind 127.0.0.1,这意味着 Redis 实例只能接受来自本机(localhost)的连接访问。将 Redis 监听的IP地址设置为 0.0.0.0,表示 Redis 将监听所有可用的网络接口。这意味着它可以接受来自任意 IP 地址的外部访问。
1
bind 0.0.0.0
生产环境不要设置为 0.0.0.0
在生产环境中,如果设置 bind 0.0.0.0,通常需要同时配置防火墙或 ACL (访问控制列表) 以及密码保护,以避免未经授权的外部访问。
2.守护进程模式。默认通常是 daemonize no。
1
daemonize yes
配置 yes 的作用: 将 Redis 设置为守护进程 (Daemon) 模式运行。这意味着 Redis 服务器将在后台运行,脱离当前的终端会话。当终端关闭后,Redis 进程仍然会继续运行,适合作为服务长期运行。
3.设置访问密码。默认是注释掉的(相当于没有密码)。
1
requirepass 123321
任何客户端在连接到 Redis 实例后,必须使用 AUTH 命令并提供正确的密码(这里是 123321)才能执行数据操作,提高安全性。
4.设置 Redis 服务器监听的TCP端口号。
1
port 6379
Redis 服务器将监听 6379端口等待客户端连接。6379是 Redis 官方默认的端口号。
5.设置 Redis 的工作目录。默认情况下,通常是运行 redis-server 命令时的当前目录。
1
dir .
将工作目录设置为 .,即当前目录(Redis 服务器启动时所在的目录)。所有需要保存在磁盘上的文件,如持久化文件 (RDB 快照、AOF 文件) 和日志文件(如果指定了相对路径),都会存储在这个目录下。
6.设置可用的数据库数量。默认是 databases 16,即16个数据库,编号从 0到 15。
1
databases 1
当前配置 1 的作用: 将 Redis 实例中可供使用的数据库数量设置为1 个。此时,客户端只能使用编号为0的数据库。
7.设置 Redis 能够使用的最大内存限制。默认是没有限制的(通常是注释掉的)。
1
maxmemory 512mb
配置 512mb 的作用: 限制 Redis 实例可使用的内存总量为512兆字节。当内存使用量达到这个限制时,Redis 会根据配置的内存淘汰策略 (maxmemory-policy) 移除数据,以确保不超过限制。
8.设置日志文件的路径和名称。默认是空字符串 "",表示不记录日志到文件(日志可能只输出到标准输出/终端)。
1
logfile "redis.log"
7.redis知识点罗列(不全)
redis缓存穿透
缓存穿透指的是查询一个根本不存在的数据,导致请求直接穿过缓存(Redis),到达持久层存储(通常是数据库,比如mysql)。
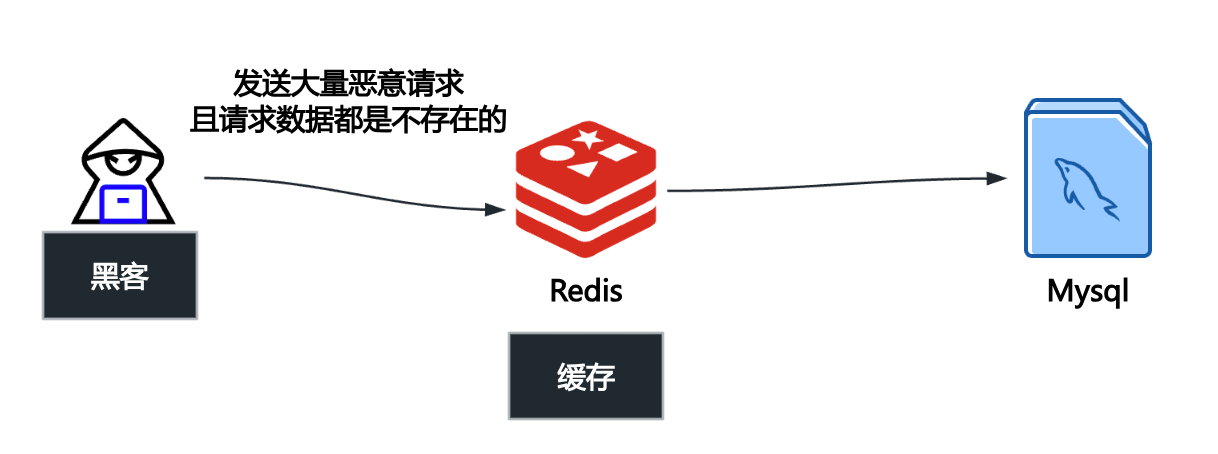
当这种请求量很大时,每次查询都会落到数据库上,就像缓存“失效”了一样,给数据库带来巨大的压力,甚至可能导致数据库宕机。
解决缓存穿透主要有两种主流且高效的方法:缓存空值/短期默认值 和 布隆过滤器 (Bloom Filter)。
(1)缓存空值/短期默认值:当查询请求发现 Key 在缓存中和数据库中都不存在时,我们仍然将这个 空结果(例如:null 或一个特定的默认值如 -1)写入 Redis 缓存。并且这个写入的空值设置一个较短的过期时间(例如 60 秒)。后续对该 Key 的查询会命中 Redis 中的空值,直接返回,避免了对数据库的再次查询。
这么做缺点是:浪费了 Redis 内存空间来存储这些空 Key,并且需要设置合理的过期时间(防止数据在短期内被写入数据库后,仍然被缓存的空值阻塞)。
(2)布隆过滤器 (Bloom Filter)/布谷鸟过滤器(加强版-布隆过滤器):布隆过滤器是一个概率型数据结构。它可以在应用服务器和 Redis/数据库之间建立一个快速的“黑名单”或“白名单”。它能高效地判断一个 Key 一定不存在,但不能保证 Key 一定存在(存在极低的误判率,即“误报”)。
具体做法:将数据库中所有实际存在的 Key 的哈希值预先加载到布隆过滤器中。用户发起查询请求时,先通过布隆过滤器进行检查。如果布隆过滤器判断 Key 不存在(即“黑名单”),则直接拒绝该请求,甚至不进行 Redis 查询。如果布隆过滤器判断 Key 可能存在,请求才继续查 Redis 和数据库。
优点:占用的内存空间极小,效率极高,可以完全拦截对数据库的无效请求,是防御恶意穿透的利器。
缺点:存在误判率;当数据库数据发生变化时,布隆过滤器需要同步更新。
对于一般的业务场景,缓存空值已经足够有效。对于有高并发或恶意攻击风险的核心业务,则推荐使用 布隆过滤器 进行更全面的保护。
redis缓存击穿 (Cache Breakdown)
缓存击穿指的是 Redis 中某个 热点 Key 突然 过期(或被删除)的瞬间,大量针对该 Key 的并发请求,在 Redis 中查询未命中,瞬间全部涌向数据库,对数据库造成巨大的压力。
“热点 Key”是指那些访问频率极高、并发量巨大的 Key。例如:
- 电商平台秒杀商品的库存信息。
- 某个新闻网站头条文章的访问计数。
- 高流量明星或主播的个人主页数据。
第一个成功查询数据库并完成计算的请求,会将新数据写回 Redis,后续请求恢复正常。但在回写完成之前,数据库已经承受了短时的高峰压力。
解决缓存击穿的核心思想是:阻止大量请求同时去查询数据库,或者延长热点 Key 的生命周期。
(1)互斥锁(Mutex Lock / 分布式锁)—最常用、最有效
只允许第一个请求去查询数据库和回写缓存,其他请求必须等待。
流程:
- 请求 A 发现 Redis 未命中。
- 请求 A 立即尝试获取一个针对该 Key 的分布式锁(例如,使用上文提到的 Redis Lua 脚本实现的锁)。
- 请求 A 成功获取锁,然后去查询数据库、回写缓存,最后释放锁。
- 请求 B, C, D… 尝试获取锁,但失败了。它们要么在循环中等待锁(Spinning),要么等待一段时间后重试,或者直接返回默认值。
- 当请求 A 释放锁后,等待中的请求 B 抢到锁,它发现缓存已经被 A 更新了,于是直接从 Redis 中取出数据返回,然后释放锁。
优点:保证了数据库在同一时刻只会被一个请求访问,极大地保护了数据库。
(2)“永不过期”策略(逻辑过期)
让热点 Key 在 Redis 中永远不设置物理过期时间(即 TTL 永不过期),但在 Key 的 Value 中逻辑上存储一个过期时间字段。
流程:
- 系统访问 Key 时,先从 Redis 中取出 Value。
- 检查 Value 中存储的逻辑过期时间是否已经到达。
- 如果逻辑时间未过期,则直接返回数据。
- 如果逻辑时间已过期,则启动一个后台线程去异步地执行数据库查询和缓存重建工作。同时,主线程仍向用户返回旧数据(可以接受短暂的旧数据),避免阻塞用户请求。
优点:用户永远不会感知到 Key 过期导致的延迟;数据库重建操作被放在后台异步执行,不影响前端高并发的实时响应。
(3)设置合理的预热和过期时间
对于已知的高频 Key,通过系统预热和统一设置过期时间,错开它们的过期时间点,避免它们在同一时间大量过期。
redis缓存雪崩(Cache Avalanche)
缓存雪崩指的是在短时间内,Redis 缓存中大量 Key 集中失效(过期或被清除),导致这些 Key 的所有并发请求都瞬间穿透到数据库(持久层)。
这就像雪山顶部的积雪集中崩塌一样,巨大的洪峰流量在极短的时间内冲击数据库,可能导致数据库压力过大而崩溃。
缓存雪崩通常由以下两种情况引发:
- 大规模 Key 集中过期:系统在短时间内将大量 Key 设置了相同的过期时间。当到达这个时间点时,所有这些 Key 集体失效。
- Redis 服务宕机:Redis 集群发生故障或宕机,导致整个缓存服务不可用。所有请求都无法命中缓存,直接流向数据库。
缓存雪崩的流程
- 集中过期:大量非热点 Key 或大量 Key 同时过期。
- 全部穿透:用户请求访问这些失效的 Key,导致 Redis 未命中。
- 流量洪峰:所有请求几乎同时去查询数据库,形成流量洪峰。
- 数据库崩溃:数据库在高并发查询下,连接池耗尽,最终崩溃。
- 系统瘫痪:数据库崩溃后,应用服务无法正常工作,导致整个系统瘫痪。
解决缓存雪崩的关键在于分散失效时间和提高缓存系统的可用性。
(1)分散 Key 的过期时间(避免集中失效)
在设置 Key 的过期时间时,不要使用固定的 TTL(Time To Live)。可以给基础过期时间上增加一个随机值。
(2)提高缓存系统的可用性(防止缓存宕机)
使用 Redis Sentinel(哨兵)或 Redis Cluster(集群)来部署服务,确保即使部分节点故障,整个缓存系统依然可以提供服务,避免单点故障。
(3)增加多级缓存或使用本地缓存(减轻Redis压力)
在应用服务器内部引入如 Guava Cache 等本地缓存,存储一些访问极高的数据。当 Redis 宕机时,请求可以先走本地缓存,起到一层缓冲作用。
(4)熔断降级与限流(保护数据库)
这是在雪崩发生时,对数据库的最终保护措施。
- 限流:当检测到 Redis 不可用或大量 Key 失效时,应用层可以启动限流机制,限制每秒钟允许访问数据库的请求数量。
- 熔断降级:对于非核心业务(如评论、推荐等),当数据库压力过大时,可以对这些请求进行熔断,直接返回一个默认值、友好提示或错误信息,阻止它们访问数据库。
- 数据预热:提前将热门数据加载到缓存中,并监控其 TTL,在 Key 即将过期前,通过后台任务提前更新缓存。
缓存雪崩是一个系统级的风险,需要通过分散过期时间(预防)和部署高可用集群(增强)以及熔断限流(容灾)三方面结合来解决。
数据不一致
查询redis阻塞
内存爆满
多级缓存
- 服务器本地缓存
- redis多级缓存
缓存预热
比如大促期间,提前把热门商品数据加载到redis,避免活动开始时,大量请求打到数据库
防止数据丢失
尽管 Redis 是内存存储,但它提供了将数据持久化到磁盘的机制,以防止服务器宕机时数据丢失:
- RDB (Redis Database): 定期将内存中的数据快照(Snapshot)写入磁盘。恢复快,但是可能丢失最新数据。RDB 是通过生成某一时刻的数据快照来实现持久化的,可以在特定时间间隔内保存数据的快照。适合灾难恢复和备份,能生成紧凑的二进制文件,但可能会在崩溃时丢失最后一次快照之后的数据。
- AOF (Append Only File): (每个写操作追加到日志文件中实现持久化)记录所有对 Redis 数据的修改操作命令(写操作记录),以日志形式追加到文件中。数据更安全,恢复较慢。数据恢复更为精确,但文件体积较大,重写时可能会消耗更多资源。
Redis 4.0 新增了 RDB 和 AOF 的混合持久化机制。
redis服务器挂了怎么办
主从集群
主节点挂了,从节点扛住。
 如果主节点挂了,从节点升级策略:哨兵机制。
Redis Sentinel 是一个分布式系统,它用于对 Redis 主从结构中的各个节点进行监控、通知、自动故障转移(Failover)等功能。它的核心目标就是解决 Redis 主节点的单点故障问题。
一个 Redis 哨兵系统通常由一组独立的 Sentinel 进程组成。Sentinel 进程运行在独立的服务器上,彼此之间互相通信(构成一个哨兵集群),并持续监控所有的 Redis 主节点和从节点。
哨兵机制的工作流程可以分为以下几个关键阶段:
阶段一:监控 (Monitoring)
所有哨兵进程会持续不断地检查主节点和从节点是否正常运行。
- 发送心跳:每个 Sentinel 进程会每秒向所有 Redis 实例发送一个
PING命令。
阶段二:主观下线 (Subjectively Down, SDown)
当一个 Sentinel 进程发现某个主节点在设定的时间(称为 down-after-milliseconds)内没有响应其 PING 命令,该 Sentinel 就会认为这个主节点主观下线(SDown)。
- 特点:SDown 是单个 Sentinel 节点的判断,具有主观性。
阶段三:客观下线 (Objectively Down, ODown)
为了避免单个 Sentinel 的误判,需要多个 Sentinel 达成一致意见。
- 协商:当一个 Sentinel 认为主节点 SDown 后,它会询问其他 Sentinel 进程是否也认为该主节点已经下线。
- 法定人数 (Quorum)/分布式投票(Quorum 机制):如果达到足够数量(即配置的
quorum值)的 Sentinel 进程都同意该主节点已下线,那么这个主节点的状态就会被标记为客观下线(ODown)。 - 特点:ODown 标志着多数 Sentinel 已经确认主节点故障,需要启动故障转移流程。
阶段四:故障转移 (Failover) - 从节点升级策略
一旦主节点被确认为 ODown,哨兵集群就会开始执行自动故障转移,即选择一个健康的从节点升级为新的主节点。
- 选举 Leader:在启动故障转移前,哨兵集群会通过 Raft 协议的 Leader 选举过程,在所有的 Sentinel 进程中选举出一个 Sentinel Leader,由它来主导并执行故障转移操作,以保证操作的唯一性。
- 选择最佳从节点 (Promotion):Sentinel Leader 会从所有健康的从节点中,根据以下规则择优选择一个从节点进行升级:
- 排除不合格节点:过滤掉处于断线或下线状态的从节点。
- 选择优先级高者:根据配置文件中
slave-priority(或replica-priority)最高的从节点。 - 选择复制偏移量最大者:如果优先级相同,则选择复制偏移量(Replication Offset)最大的从节点。复制偏移量越大,代表该从节点与原主节点的数据同步得越完整、越少丢失。
- 选择运行 ID 最小者:如果偏移量也相同,则选择运行 ID 最小的从节点。
- 执行升级:
- Sentinel Leader 向被选中的从节点发送
SLAVEOF NO ONE命令,使其脱离从属关系,升级为新的主节点。
- Sentinel Leader 向被选中的从节点发送
- 配置其他从节点:
- Sentinel Leader 向剩余的从节点发送
SLAVEOF <新的主节点IP> <端口>命令,让它们复制新的主节点。
- Sentinel Leader 向剩余的从节点发送
- 处理原主节点:
- 当原主节点(已下线)重新上线后,Sentinel 也会向它发送
SLAVEOF <新的主节点IP> <端口>命令,使其降级为新主节点的从节点。
- 当原主节点(已下线)重新上线后,Sentinel 也会向它发送
(redis淘汰策略/过期算法)
- maxmemory:Redis 配置文件(
redis.conf)中的一个关键参数,用于设置 Redis 实例能够使用的最大内存容量。一旦 Redis 使用的内存量达到maxmemory设定的限制,并且有新的写入操作(如SET、INCR等)发生时,Redis 就会触发相应的数据淘汰策略。maxmemory限制的是数据存储占用的内存,并不包括 RDB/AOF 持久化所需的内存、客户端连接缓冲区等。 - No eviction:不淘汰任何 Key。当内存达到限制,且有新的写入操作时,直接返回错误(如 OOM - Out of Memory 错误),拒绝写入。适用场景:数据库或关键配置存储等,不允许丢失任何数据的场景。
- volatile-lru
- volatile-ttl
- volatile-random
这些策略只考虑删除那些设置了过期时间(即设置了 TTL)的 Key。
| 策略名称 | 淘汰描述 | 适用场景 |
|---|---|---|
volatile-lru |
(Least Recently Used):淘汰设置了过期时间的 Key 中,最近最少使用的 Key。 | 当你需要保留那些“永不过期”的 Key(如配置信息、Session ID),而只对缓存数据进行淘汰时使用。 |
volatile-ttl |
(Time To Live):淘汰设置了过期时间的 Key 中,剩余生存时间(TTL)最短的 Key。 | 倾向于让即将到期的 Key 先被淘汰。 |
volatile-random |
(Random):随机地淘汰设置了过期时间的 Key 中的一部分 Key。 | 与 allkeys-random 类似,但仅针对设置了 TTL 的键。 |
- allkeys-lru
- allkeys-random
这些策略会考虑删除 Redis 实例中的所有 Key。
| 策略名称 | 淘汰描述 | 适用场景 |
|---|---|---|
allkeys-lru |
(Least Recently Used):淘汰所有键中,最近最少使用(最久没有被访问)的 Key。 | 默认推荐的通用策略,适用于将 Redis 作为纯缓存使用,且所有 Key 的重要性大致相等。 |
allkeys-random |
(Random):随机地淘汰所有 Key 中的一部分 Key。 | 内存占用均匀,但对 Key 的访问模式没有明显倾向时使用。 |
- LRU 算法:传统的 LRU 算法需要维护一个有序链表,每次访问 Key 时都需要移动链表节点。这能实现精确淘汰最久未使用的 Key。
- 近似 LRU 算法:Redis 并没有使用精确的 LRU,而是采用了近似 LRU 算法。Redis 维护一个随机采样的 Key 集合(例如,默认采样 5 个 Key)。每次需要淘汰 Key 时,它随机从数据库中取出这个小集合的 Key。然后,它从这个小样本中找出最近最少使用的那个 Key 并将其淘汰。这种近似算法在性能和淘汰准确性之间取得了极佳的平衡。通过调整采样数量,可以在性能和准确性之间进行权衡。在实际应用中,它的效果与精确 LRU 非常接近,但效率高得多。
当 Redis 内存超出物理内存限制时,内存的数据会开始和磁盘产生频繁的交换(swap)。交换会让 Redis 的性能急剧下降,对于访问量比较频繁的 Redis 来说,这样龟速的存取效率基本上等于不可用。
数据量太大,单台redis存不下
Redis Cluster (集群):将数据分散存储在多台 Redis 实例上,每台实例只存储总数据量的一部分。
客户端分片:在客户端通过特定的【哈希算法】将数据分散到不同的 Redis 实例中。
其他注意点
(1)合理设计缓存键名
使用有意义的前缀,比如 user:1001:profile、 article:2023:hot,这样便于管理和避免冲突。
(2)设置合适的过期时间
根据数据特点设置,热门数据可以长一些(1小时)
普通数据短一些(10分钟),还要加上随机值,避免同时过期。
(3)选择正确的数据结构
不要什么都用 String, 存对象用 Hash, 存列表用 List, 存排行榜用 SortedSet。
附录:redis源码方式安装的readme文件
1
2
3
4
5
6
7
8
9
10
11
12
13
14
15
16
17
18
19
20
21
22
23
24
25
26
27
28
29
30
31
32
33
34
35
36
37
38
39
40
41
42
43
44
45
46
47
48
49
50
51
52
53
54
55
56
57
58
59
60
61
62
63
64
65
66
67
68
69
70
71
72
73
74
75
76
77
78
79
80
81
82
83
84
85
86
87
88
89
90
91
92
93
94
95
96
97
98
99
100
101
102
103
104
105
106
107
108
109
110
111
112
113
114
115
116
117
118
119
120
121
122
123
124
125
126
127
128
129
130
131
132
133
134
135
136
137
138
139
140
141
142
143
144
145
146
147
148
149
150
151
152
153
154
155
156
157
158
159
160
161
162
163
164
165
166
167
168
169
170
171
172
173
174
175
176
177
178
179
180
181
182
183
184
185
186
187
188
189
190
191
192
193
194
195
196
197
198
199
200
201
202
203
204
205
206
207
208
209
210
211
212
213
214
215
216
217
218
219
220
221
222
223
224
225
226
227
228
229
230
231
232
233
234
235
236
237
238
239
240
241
242
243
244
245
246
247
248
249
250
251
252
253
254
255
256
257
258
259
260
261
262
263
264
265
266
267
268
269
270
271
272
273
274
275
276
277
278
279
280
281
282
283
284
285
286
287
288
289
290
291
292
293
294
295
296
297
298
299
300
301
302
303
304
305
306
307
308
309
310
311
312
313
314
315
316
317
318
319
320
321
322
323
324
325
326
327
328
329
330
331
332
333
334
335
336
337
338
339
340
341
342
343
344
345
346
347
348
349
350
351
352
353
354
355
356
357
358
359
360
361
362
363
364
365
366
367
368
369
370
371
372
373
374
375
376
377
378
379
380
381
382
383
384
385
386
387
388
389
390
391
392
393
394
395
396
397
398
399
400
401
402
403
404
405
406
407
408
409
410
411
412
413
414
415
416
417
418
419
420
421
422
423
424
425
426
427
428
429
430
431
432
433
434
435
436
437
438
439
440
441
442
443
444
445
446
447
448
449
450
451
452
453
454
455
456
457
458
459
460
461
462
463
464
465
466
467
468
469
470
471
472
473
474
475
476
477
478
479
480
481
482
483
484
485
486
487
488
489
490
491
492
493
494
495
496
497
498
499
500
501
502
503
504
505
506
This README is just a fast *quick start* document. You can find more detailed documentation at [redis.io](https://redis.io).

What is Redis?
--------------

Redis is often referred to as a *data structures* server. What this means is that Redis provides access to mutable data structures via a set of commands, which are sent using a *server-client* model with TCP sockets and a simple protocol. So different processes can query and modify the same data structures in a shared way.

Data structures implemented into Redis have a few special properties:

* Redis cares to store them on disk, even if they are always served and modified into the server memory. This means that Redis is fast, but that it is also non-volatile.
* The implementation of data structures emphasizes memory efficiency, so data structures inside Redis will likely use less memory compared to the same data structure modelled using a high-level programming language.
* Redis offers a number of features that are natural to find in a database, like replication, tunable levels of durability, clustering, and high availability.

Another good example is to think of Redis as a more complex version of memcached, where the operations are not just SETs and GETs, but operations that work with complex data types like Lists, Sets, ordered data structures, and so forth.

If you want to know more, this is a list of selected starting points:

* Introduction to Redis data types. https://redis.io/topics/data-types-intro
* Try Redis directly inside your browser. https://try.redis.io
* The full list of Redis commands. https://redis.io/commands
* There is much more inside the official Redis documentation. https://redis.io/documentation

Building Redis
--------------

Redis can be compiled and used on Linux, OSX, OpenBSD, NetBSD, FreeBSD.
We support big endian and little endian architectures, and both 32 bit
and 64 bit systems.

It may compile on Solaris derived systems (for instance SmartOS) but our
support for this platform is *best effort* and Redis is not guaranteed to
work as well as in Linux, OSX, and \*BSD.

It is as simple as:

    % make

To build with TLS support, you'll need OpenSSL development libraries (e.g.
libssl-dev on Debian/Ubuntu) and run:

    % make BUILD_TLS=yes

To build with systemd support, you'll need systemd development libraries (such
as libsystemd-dev on Debian/Ubuntu or systemd-devel on CentOS) and run:

    % make USE_SYSTEMD=yes

To append a suffix to Redis program names, use:

    % make PROG_SUFFIX="-alt"

You can build a 32 bit Redis binary using:

    % make 32bit

After building Redis, it is a good idea to test it using:

    % make test

If TLS is built, running the tests with TLS enabled (you will need `tcl-tls`
installed):

    % ./utils/gen-test-certs.sh
    % ./runtest --tls


Fixing build problems with dependencies or cached build options
---------

Redis has some dependencies which are included in the `deps` directory.
`make` does not automatically rebuild dependencies even if something in
the source code of dependencies changes.

When you update the source code with `git pull` or when code inside the
dependencies tree is modified in any other way, make sure to use the following
command in order to really clean everything and rebuild from scratch:

    % make distclean

This will clean: jemalloc, lua, hiredis, linenoise and other dependencies.

Also if you force certain build options like 32bit target, no C compiler
optimizations (for debugging purposes), and other similar build time options,
those options are cached indefinitely until you issue a `make distclean`
command.

Fixing problems building 32 bit binaries
---------

If after building Redis with a 32 bit target you need to rebuild it
with a 64 bit target, or the other way around, you need to perform a
`make distclean` in the root directory of the Redis distribution.

In case of build errors when trying to build a 32 bit binary of Redis, try
the following steps:

* Install the package libc6-dev-i386 (also try g++-multilib).
* Try using the following command line instead of `make 32bit`:
  `make CFLAGS="-m32 -march=native" LDFLAGS="-m32"`

Allocator
---------

Selecting a non-default memory allocator when building Redis is done by setting
the `MALLOC` environment variable. Redis is compiled and linked against libc
malloc by default, with the exception of jemalloc being the default on Linux
systems. This default was picked because jemalloc has proven to have fewer
fragmentation problems than libc malloc.

To force compiling against libc malloc, use:

    % make MALLOC=libc

To compile against jemalloc on Mac OS X systems, use:

    % make MALLOC=jemalloc

Monotonic clock
---------------

By default, Redis will build using the POSIX clock_gettime function as the
monotonic clock source.  On most modern systems, the internal processor clock
can be used to improve performance.  Cautions can be found here:
    http://oliveryang.net/2015/09/pitfalls-of-TSC-usage/

To build with support for the processor's internal instruction clock, use:

    % make CFLAGS="-DUSE_PROCESSOR_CLOCK"

Verbose build
-------------

Redis will build with a user-friendly colorized output by default.
If you want to see a more verbose output, use the following:

    % make V=1

Running Redis
-------------

To run Redis with the default configuration, just type:

    % cd src
    % ./redis-server

If you want to provide your redis.conf, you have to run it using an additional
parameter (the path of the configuration file):

    % cd src
    % ./redis-server /path/to/redis.conf

It is possible to alter the Redis configuration by passing parameters directly
as options using the command line. Examples:

    % ./redis-server --port 9999 --replicaof 127.0.0.1 6379
    % ./redis-server /etc/redis/6379.conf --loglevel debug

All the options in redis.conf are also supported as options using the command
line, with exactly the same name.

Running Redis with TLS:
------------------

Please consult the [TLS.md](TLS.md) file for more information on
how to use Redis with TLS.

Playing with Redis
------------------

You can use redis-cli to play with Redis. Start a redis-server instance,
then in another terminal try the following:

    % cd src
    % ./redis-cli
    redis> ping
    PONG
    redis> set foo bar
    OK
    redis> get foo
    "bar"
    redis> incr mycounter
    (integer) 1
    redis> incr mycounter
    (integer) 2
    redis>

You can find the list of all the available commands at https://redis.io/commands.

Installing Redis
-----------------

In order to install Redis binaries into /usr/local/bin, just use:

    % make install

You can use `make PREFIX=/some/other/directory install` if you wish to use a
different destination.

`make install` will just install binaries in your system, but will not configure
init scripts and configuration files in the appropriate place. This is not
needed if you just want to play a bit with Redis, but if you are installing
it the proper way for a production system, we have a script that does this
for Ubuntu and Debian systems:

    % cd utils
    % ./install_server.sh

_Note_: `install_server.sh` will not work on Mac OSX; it is built for Linux only.

The script will ask you a few questions and will setup everything you need
to run Redis properly as a background daemon that will start again on
system reboots.

You'll be able to stop and start Redis using the script named
`/etc/init.d/redis_<portnumber>`, for instance `/etc/init.d/redis_6379`.

Code contributions
-----------------

Note: By contributing code to the Redis project in any form, including sending
a pull request via Github, a code fragment or patch via private email or
public discussion groups, you agree to release your code under the terms
of the BSD license that you can find in the [COPYING][1] file included in the Redis
source distribution.

Please see the [CONTRIBUTING.md][2] file in this source distribution for more
information. For security bugs and vulnerabilities, please see [SECURITY.md][3].

[1]: https://github.com/redis/redis/blob/unstable/COPYING
[2]: https://github.com/redis/redis/blob/unstable/CONTRIBUTING.md
[3]: https://github.com/redis/redis/blob/unstable/SECURITY.md

Redis internals
===

If you are reading this README you are likely in front of a Github page
or you just untarred the Redis distribution tar ball. In both the cases
you are basically one step away from the source code, so here we explain
the Redis source code layout, what is in each file as a general idea, the
most important functions and structures inside the Redis server and so forth.
We keep all the discussion at a high level without digging into the details
since this document would be huge otherwise and our code base changes
continuously, but a general idea should be a good starting point to
understand more. Moreover most of the code is heavily commented and easy
to follow.

Source code layout
---

The Redis root directory just contains this README, the Makefile which
calls the real Makefile inside the `src` directory and an example
configuration for Redis and Sentinel. You can find a few shell
scripts that are used in order to execute the Redis, Redis Cluster and
Redis Sentinel unit tests, which are implemented inside the `tests`
directory.

Inside the root are the following important directories:

* `src`: contains the Redis implementation, written in C.
* `tests`: contains the unit tests, implemented in Tcl.
* `deps`: contains libraries Redis uses. Everything needed to compile Redis is inside this directory; your system just needs to provide `libc`, a POSIX compatible interface and a C compiler. Notably `deps` contains a copy of `jemalloc`, which is the default allocator of Redis under Linux. Note that under `deps` there are also things which started with the Redis project, but for which the main repository is not `redis/redis`.

There are a few more directories but they are not very important for our goals
here. We'll focus mostly on `src`, where the Redis implementation is contained,
exploring what there is inside each file. The order in which files are
exposed is the logical one to follow in order to disclose different layers
of complexity incrementally.

Note: lately Redis was refactored quite a bit. Function names and file
names have been changed, so you may find that this documentation reflects the
`unstable` branch more closely. For instance, in Redis 3.0 the `server.c`
and `server.h` files were named `redis.c` and `redis.h`. However the overall
structure is the same. Keep in mind that all the new developments and pull
requests should be performed against the `unstable` branch.

server.h
---

The simplest way to understand how a program works is to understand the
data structures it uses. So we'll start from the main header file of
Redis, which is `server.h`.

All the server configuration and in general all the shared state is
defined in a global structure called `server`, of type `struct redisServer`.
A few important fields in this structure are:

* `server.db` is an array of Redis databases, where data is stored.
* `server.commands` is the command table.
* `server.clients` is a linked list of clients connected to the server.
* `server.master` is a special client, the master, if the instance is a replica.

There are tons of other fields. Most fields are commented directly inside
the structure definition.

Another important Redis data structure is the one defining a client.
In the past it was called `redisClient`, now just `client`. The structure
has many fields, here we'll just show the main ones:
```c
struct client {
    int fd;
    sds querybuf;
    int argc;
    robj **argv;
    redisDb *db;
    int flags;
    list *reply;
    // ... many other fields ...
    char buf[PROTO_REPLY_CHUNK_BYTES];
}
```
The client structure defines a *connected client*:

* The `fd` field is the client socket file descriptor.
* `argc` and `argv` are populated with the command the client is executing, so that functions implementing a given Redis command can read the arguments.
* `querybuf` accumulates the requests from the client, which are parsed by the Redis server according to the Redis protocol and executed by calling the implementations of the commands the client is executing.
* `reply` and `buf` are dynamic and static buffers that accumulate the replies the server sends to the client. These buffers are incrementally written to the socket as soon as the file descriptor is writable.

As you can see in the client structure above, arguments in a command
are described as `robj` structures. The following is the full `robj`
structure, which defines a *Redis object*:

```c
struct redisObject {
    unsigned type:4;
    unsigned encoding:4;
    unsigned lru:LRU_BITS; /* LRU time (relative to global lru_clock) or
                            * LFU data (least significant 8 bits frequency
                            * and most significant 16 bits access time). */
    int refcount;
    void *ptr;
};
```

Basically this structure can represent all the basic Redis data types like
strings, lists, sets, sorted sets and so forth. The interesting thing is that
it has a `type` field, so that it is possible to know what type a given
object has, and a `refcount`, so that the same object can be referenced
in multiple places without allocating it multiple times. Finally the `ptr`
field points to the actual representation of the object, which might vary
even for the same type, depending on the `encoding` used.

Redis objects are used extensively in the Redis internals, however in order
to avoid the overhead of indirect accesses, recently in many places
we just use plain dynamic strings not wrapped inside a Redis object.

server.c
---

This is the entry point of the Redis server, where the `main()` function
is defined. The following are the most important steps in order to startup
the Redis server.

* `initServerConfig()` sets up the default values of the `server` structure.
* `initServer()` allocates the data structures needed to operate, setup the listening socket, and so forth.
* `aeMain()` starts the event loop which listens for new connections.

There are two special functions called periodically by the event loop:

1. `serverCron()` is called periodically (according to `server.hz` frequency), and performs tasks that must be performed from time to time, like checking for timed out clients.
2. `beforeSleep()` is called every time the event loop fired, Redis served a few requests, and is returning back into the event loop.

Inside server.c you can find code that handles other vital things of the Redis server:

* `call()` is used in order to call a given command in the context of a given client.
* `activeExpireCycle()` handles eviction of keys with a time to live set via the `EXPIRE` command.
* `performEvictions()` is called when a new write command should be performed but Redis is out of memory according to the `maxmemory` directive.
* The global variable `redisCommandTable` defines all the Redis commands, specifying the name of the command, the function implementing the command, the number of arguments required, and other properties of each command.

commands.c
---
This file is auto generated by utils/generate-command-code.py, the content is based on the JSON files in the src/commands folder.
These are meant to be the single source of truth about the Redis commands, and all the metadata about them.
These JSON files are not meant to be used by anyone directly, instead that metadata can be obtained via the `COMMAND` command.

networking.c
---

This file defines all the I/O functions with clients, masters and replicas
(which in Redis are just special clients):

* `createClient()` allocates and initializes a new client.
* The `addReply*()` family of functions are used by command implementations in order to append data to the client structure, that will be transmitted to the client as a reply for a given command executed.
* `writeToClient()` transmits the data pending in the output buffers to the client and is called by the *writable event handler* `sendReplyToClient()`.
* `readQueryFromClient()` is the *readable event handler* and accumulates data read from the client into the query buffer.
* `processInputBuffer()` is the entry point in order to parse the client query buffer according to the Redis protocol. Once commands are ready to be processed, it calls `processCommand()` which is defined inside `server.c` in order to actually execute the command.
* `freeClient()` deallocates, disconnects and removes a client.

aof.c and rdb.c
---

As you can guess from the names, these files implement the RDB and AOF
persistence for Redis. Redis uses a persistence model based on the `fork()`
system call in order to create a process with the same (shared) memory
content of the main Redis process. This secondary process dumps the content
of the memory on disk. This is used by `rdb.c` to create the snapshots
on disk and by `aof.c` in order to perform the AOF rewrite when the
append only file gets too big.

The implementation inside `aof.c` has additional functions in order to
implement an API that allows commands to append new commands into the AOF
file as clients execute them.

The `call()` function defined inside `server.c` is responsible for calling
the functions that in turn will write the commands into the AOF.

db.c
---

Certain Redis commands operate on specific data types; others are general.
Examples of generic commands are `DEL` and `EXPIRE`. They operate on keys
and not on their values specifically. All those generic commands are
defined inside `db.c`.

Moreover `db.c` implements an API in order to perform certain operations
on the Redis dataset without directly accessing the internal data structures.

The most important functions inside `db.c` which are used in many command
implementations are the following:

* `lookupKeyRead()` and `lookupKeyWrite()` are used in order to get a pointer to the value associated to a given key, or `NULL` if the key does not exist.
* `dbAdd()` and its higher level counterpart `setKey()` create a new key in a Redis database.
* `dbDelete()` removes a key and its associated value.
* `emptyDb()` removes an entire single database or all the databases defined.

The rest of the file implements the generic commands exposed to the client.

object.c
---

The `robj` structure defining Redis objects was already described. Inside
`object.c` there are all the functions that operate with Redis objects at
a basic level, like functions to allocate new objects, handle the reference
counting and so forth. Notable functions inside this file:

* `incrRefCount()` and `decrRefCount()` are used in order to increment or decrement an object reference count. When it drops to 0 the object is finally freed.
* `createObject()` allocates a new object. There are also specialized functions to allocate string objects having a specific content, like `createStringObjectFromLongLong()` and similar functions.

This file also implements the `OBJECT` command.

replication.c
---

This is one of the most complex files inside Redis, it is recommended to
approach it only after getting a bit familiar with the rest of the code base.
In this file there is the implementation of both the master and replica role
of Redis.

One of the most important functions inside this file is `replicationFeedSlaves()` that writes commands to the clients representing replica instances connected
to our master, so that the replicas can get the writes performed by the clients:
this way their data set will remain synchronized with the one in the master.

This file also implements both the `SYNC` and `PSYNC` commands that are
used in order to perform the first synchronization between masters and
replicas, or to continue the replication after a disconnection.

Script
---

The script unit is composed of 3 units:
* `script.c` - integration of scripts with Redis (commands execution, set replication/resp, ...)
* `script_lua.c` - responsible to execute Lua code, uses script.c to interact with Redis from within the Lua code.
* `function_lua.c` - contains the Lua engine implementation, uses script_lua.c to execute the Lua code.
* `functions.c` - contains Redis Functions implementation (FUNCTION command), uses functions_lua.c if the function it wants to invoke needs the Lua engine.
* `eval.c` - contains the `eval` implementation using `script_lua.c` to invoke the Lua code.


Other C files
---

* `t_hash.c`, `t_list.c`, `t_set.c`, `t_string.c`, `t_zset.c` and `t_stream.c` contains the implementation of the Redis data types. They implement both an API to access a given data type, and the client command implementations for these data types.
* `ae.c` implements the Redis event loop, it's a self contained library which is simple to read and understand.
* `sds.c` is the Redis string library, check https://github.com/antirez/sds for more information.
* `anet.c` is a library to use POSIX networking in a simpler way compared to the raw interface exposed by the kernel.
* `dict.c` is an implementation of a non-blocking hash table which rehashes incrementally.
* `cluster.c` implements the Redis Cluster. Probably a good read only after being very familiar with the rest of the Redis code base. If you want to read `cluster.c` make sure to read the [Redis Cluster specification][4].

[4]: https://redis.io/topics/cluster-spec

Anatomy of a Redis command
---

All the Redis commands are defined in the following way:

```c
void foobarCommand(client *c) {
    printf("%s",c->argv[1]->ptr); /* Do something with the argument. */
    addReply(c,shared.ok); /* Reply something to the client. */
}
```

The command function is referenced by a JSON file, together with its metadata, see `commands.c` described above for details.
The command flags are documented in the comment above the `struct redisCommand` in `server.h`.
For other details, please refer to the `COMMAND` command. https://redis.io/commands/command/

After the command operates in some way, it returns a reply to the client,
usually using `addReply()` or a similar function defined inside `networking.c`.

There are tons of command implementations inside the Redis source code
that can serve as examples of actual commands implementations (e.g. pingCommand). Writing
a few toy commands can be a good exercise to get familiar with the code base.

There are also many other files not described here, but it is useless to
cover everything. We just want to help you with the first steps.
Eventually you'll find your way inside the Redis code base :-)

Enjoy!